


I was really looking forward to this build and flying but as happens in RC now and then, that was short-lived.
Text, photos and video by Tom Hintz
Posted – 5-3-2019
Note: This Review project was made possible through support from my “Texas Bill Squad” that has helped me out for years. I can’t say enough about these guys or the impact they have had on the growth of FlyingRC.net.
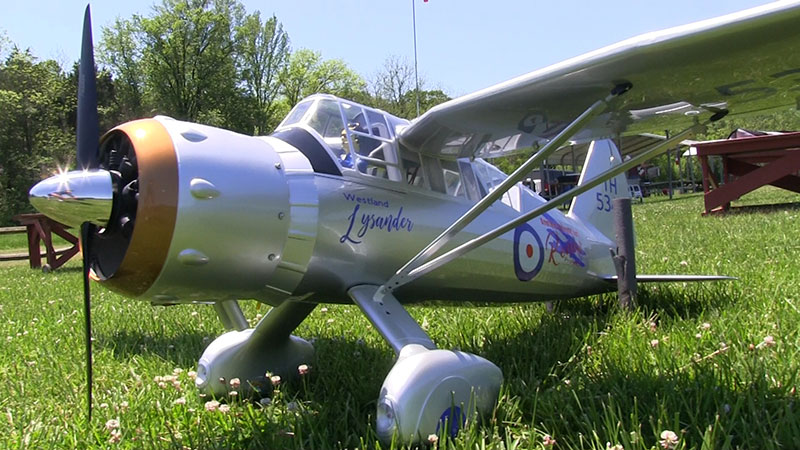
I’ve been flying RC planes for about 40 years and find myself increasingly attracted to classic planes that are by design nearly incapable of tearing holes in the sky. When looking for the next FlyingRC.net build project the Phoenix Model Giant Westland Lysander caught my attention. The fact that it comes from Phoenix Model didn’t hurt anything either.
The Phoenix Model Giant Westland Lysander features a 126" (3200mm) wingspan with a Naca airfoil. This elliptically-shaped wing would surprise me with the amount of lift it generates. The overall length is 74.8" (1901mm). That produces a wing area of 1464 sq in (94.56 sq dm) and a wing loading of 36.04oz sq ft (110g/sq dm). The projected flying weight is 23.1 - 26.4lbs (10.5 - 12kg).
The Phoenix Model Giant Westland Lysander emerged from its impressively large, double-walled shipping carton in perfect condition, including the UltraCote covering that showed no loose edges, seams or wrinkles over open structure. All the components were checked as they were unwrapped, and I could find no damage.
This is a two-piece wing on twin wing tubes that pass through the upper portion of the cockpit area. The wing halves are secured with captured bolts within the top of the fuselage. Functional, two-piece struts are bolted to the formed aluminum landing gear on each side. I would find out just how “functional” these struts are on such long wing panels. We will look at this in the maiden segment of this Review coming shortly. Don’t worry, the Phoenix Model Giant Westland Lysander survives.

The hidden aileron servo mounts were very solid.
Despite the large, removable forward canopy section, access to the remaining “greenhouse” area is a bit awkward. There is a bunch of structure within the greenhouse that supports the wing which precludes more extensive access. The good news is that not much gets installed in that portion of the greenhouse. There is a platform near the front of that area where I mounted the Spektrum Powersafe 12-channel receiver and my usual twin 5000mAh LiPo receiver batteries.
The greenhouse sports painted-on, canopy frame lines. A surprisingly detailed instrument panel and painted pilot bust were factory installed. This is a “stand-off scale” model to be sure. Get too close and the pilot appears to be having some kind of seizure with his arms suspended out in front of him, holding an imaginary yoke. This is scale on my level.
I used a Spektrum ix12 transmitter (Review underway at this writing) and a 12-channel, Spektrum PowerSafe receiver that gave me the option of putting each flap servo on its own channel for the ultimate in “tweak-ability”. I used HiTec HS-7954SH (403 oz/in at 7.4V) on the ailerons, elevator halves and rudder. HiTec HS-5665MH (194 oz/in at 7.4V) servos operate the flaps and throttle. Admittedly both servo styles are overkill for this plane, but I always buy more servo than needed to avoid servos straining all the time and to make them useful in more applications later.
The rudder and dual elevator servos mount in the area below the removable canopy section. Despite the cavernous-looking interior the elevator servos mount a bit higher than the rudder servo to avoid conflict. Factory installed tubes guide the metal elevator pushrods and pull-pull wires through the tail section to the control surfaces and tail wheel.
The aileron and flap servos are “buried” in the wing with their linkages mostly concealed by passing through the trailing edge of the wing to give the Phoenix Model Giant Westland Lysander more of a realistic look. The servos are secured to robust, factory-built mounts. The aileron servos are installed at an angle because the wing is rather thin at that point. The flap servos are mounted normally in the thickest part of the wing.
The semi-concealed linkages are slightly more difficult to install and adjust but that just takes a few more minutes. Count on going through the install, remove, adjust cycle a couple times. This adds a few minutes to the overall assembly and is not a big deal.
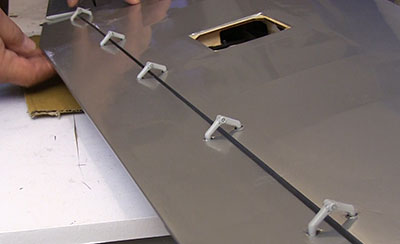
There were no strings installed at the factory for pulling servo cables through the wing structure and out at the root. I tied a metal nut to some string and dropped that down through the wing to pull the servo cables through. No adult language required.
The only part of the Phoenix Model Giant Westland Lysander hardware I replaced was the pull-pull components. They use plastic ends molded onto metal shafts, one of which fell apart during construction of my Phoenix Model Waco. As I did on the Phoenix Model Waco, I substituted a DuBro 4-40 pull-pull set (DuBro #518) on the rudder and another on the steerable tail wheel. Both pull-pull systems are driven by one rudder servo.
Lots of very sturdy pin-type hinges are used.
The Phoenix Model Giant Westland Lysander uses good-sized pin hinges throughout. The flaps are fitted with special “bent” pin hinges that produce the effective/realistic drop-down motion. The hinges come inserted in their holes but not glued. I used 30-minute epoxy to secure the hinges with no surprises or issues encountered.
The Phoenix Model Giant Westland Lysander 10-1/2 ft wing is made up of two 5ft panels with two aluminum wing tubes and aluminum struts. The wing panels are secured by factory-installed bolts with fiber washers in the top of the fuselage. To make getting the metal bars built under that washer I filed a small “ramp” on the ends of the metal bars that let the slip under the washer more easily.
The wing end of the struts are screwed into plywood panels built into the wing structure. I went to slightly larger screws with rubber-backed washers at those points to strengthen that connection just to make myself feel proactive. I have not seen or heard anything about this connection being weak.
To install the struts, we must drill holes for screws that secure the ends of the struts to the underside of the wing. I did this with the plane upright, with one wing on at a time because my work area lacks room for both wings. I would find out on Maiden day that this was not a good idea. The instruction manual shows the plane upside down when installing the struts but that might have been for clarity rather than a required procedure. There is no text regarding this procedure. I now (post maiden flight) think this is a crucial part of assembly. The way I installed the struts induced a good bit of stress on them (front to back) when assembling them to the mounting tabs on the landing gear. This was very nearly a fatal (for the plane) error on my part. Twisting such a long wing panel, even a little can have dramatic effects on how it flies.
I would end up re-mounting the struts with the plane inverted to make sure there is no stress that could twist the wing. The Maiden video will be posted in the days following this Build segment, but I can say that now with the struts installed properly, the Phoenix Model Giant Westland Lysander flies great.
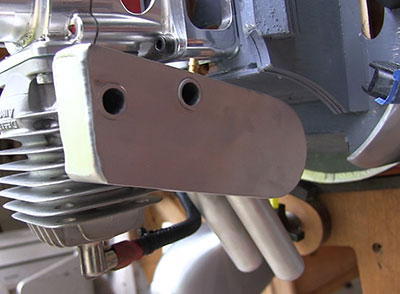
I had to trim the fuse a little to get the muffler in place.
I installed a DA60 engine with a Bisson, wrap-around, Pitts-style muffler (# 9256) to the tough-looking motor box. I had seen several posts about this plane coming pre-drilled for the DLE61, but this kit came with a blank firewall and templates for the DLE61 and another for the OS60. I drilled the firewall for my DA60 with no issues, land mines or drama involved.
The suggested firewall to prop washer dimension is 170mm, the same dimension of the DA60 and its normal standoffs. The Phoenix Model Giant Westland Lysander kit includes engine mounting hardware, including standoffs but I used my existing hardware, including blind nuts to hang the DA60.
The bottom of the motor box is curved, offering plenty of clearance for the Bisson Pitts style muffler. Bisson is my go-to muffler source because they make a very high-quality muffler and include an aluminum strap to stabilize the cans on Pitts-style mufflers to resist vibrations. See Resources below for a link to Bisson. Be aware that you need to use something other than the Google Chrome browser when ordering through the Bisson site.
Also, Bisson recommends not using paper-style gaskets with their mufflers. They specify using silicone exhaust gasket material instead. We have a story “Tight Mufflers, No Gaskets” on this technique on this site. See Resources below for a link to that story.
As I always do, I added a Tech-Aero Ultra IBEC (ignition battery eliminator circuit) that in addition to getting rid of a dedicated ignition battery, provides a reliable way to kill the engine from the transmitter. See Resources below for my original Review of the Tech-Aero Ultra IBEC. I usually assign the IBEC to the Trainer button so accidentally shutting the engine off is way more difficult than bumping a toggle switch.
The Phoenix Model Giant Westland Lysander comes with a 24oz (750cc) fuel tank but I installed a DuBro 20-once tank to clear the bottom of the removable cockpit. Also, the kit includes a black plastic, 3.75" (95mm) diameter spinner but I had a polished aluminum spinner so installed that for a little “bling”.
The cowl on the original 1930’s Lysander “Lizzie” had pilot-operated flaps on the rear that regulated airflow to manage engine temperature. The Phoenix Model Giant Westland Lysander cowl is formed with those flaps in the open position which along with a built-in opening all the way around its rear edge provides a huge amount exit area that should make it easy to keep the DA60 cool. The cowl is secured to six mounts that are epoxied and screwed to the fuselage. This is one of the best cowl mounting systems I have worked with.
I must admit that I hate wheel pants and seldom attempt to put them on my models. This disdain comes from my penchant for touch-and-goes on grass fields that essentially murders most wheel pants. That has changed a bit with giant scale planes because their wheel pants are more substantial and the wheels large enough to prevent most grass-related damage.
The one-piece Phoenix Model Giant Westland Lysander wheel pant/strut cover assemblies eliminate lots of the frustrating fitting and problem solving associated with more traditional, multi-part, “you-build-them” assemblies. I had to do a little creative filling of a gap at the fuselage, but all told, I am impressed. I was even more impressed when I discovered that the lights set into the front of both wheel pants are decorative and have no wiring. Like I said, I’m not a true scale person. If at some point the Phoenix Model Giant Westland Lysander wheel pants self-destruct, I will edit this portion of the Review to read I never liked them in the first place.
The 5-1/4”-diameter wheels need to be shimmed a bit to get them centered. This is a small tweak to the normal assembly process. Don’t pay attention to this detail (like I did) and the Phoenix Model Giant Westland Lysander might want to nose over when the wheels are pushed against the side of the wheel pants and “the brakes” come on unexpectedly.
The included CG checker is a huge benefit with a
plane this large.
Years ago, I fell in love with the Aeroworks CG Buddy included in many of their kits. Phoenix Models includes their version of this tool and it makes checking the CG on a plane this large a simple, one-person task. When I built the Phoenix Model Waco, I used the included balance rig and it flew perfectly. The suggested CG point is 5.8" (147mm) back from leading edge of the wing measured at the fuselage when checking on common CG balancers.
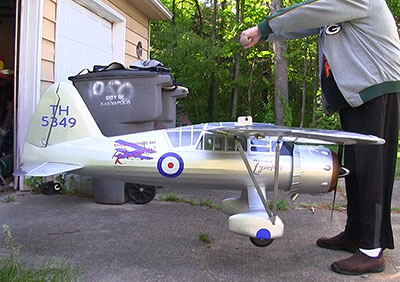
The Phoenix Model Giant Westland Lysander cost $599.99 (3-28-2019) which by itself is exceptional in this era of $800+ ARF planes. Despite the low price this is a very well-made plane with exceptional looks in the air. The airframe is a good mix of tough and light, both of which contribute to how well it flies. The system for mounting the wings at the field is simple and quick. That is refreshing in such a large plane.
When I bought the Phoenix Model Giant Westland Lysander, Tower Hobbies had a deal where they waived standard delivery and only billed the $69 oversize surcharge which when I saw the 6-foot-tall box seems more than reasonable. This double box is huge and it’s all full of airplane. Also, the Phoenix Model Giant Westland Lysander arrived at my door three days after I ordered it! It’s like Tower wants to retain customers! Consider me retained.
Stay tuned. The maiden video is in production and will be released soon.
Custom Designed FlyingRC.net Protector set for the Lysander (scroll down the page) - Click Here
Bisson Muffler
Tight Mufflers, No Gaskets
Phoenix Model Giant Westland Lysander product page – Click Here
Tech-Aero Ultra IBEC
Have a comment on this Review? –Email Me!