|
|||||


FlyingRC.net is a
Veteran-Owned site.

 |
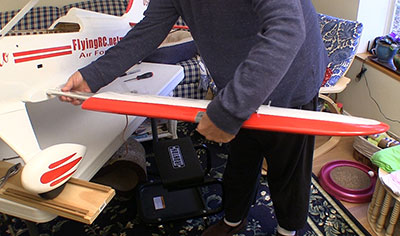
| My Phoenix Models 60cc Waco is taking shape! Click image to enlarge |
Phoenix Model Waco
Giant, “sorta-scale” classic biplane
Text, photos and video by Tom Hintz
Posted – 1-22-2019
Like many of you, RC – biplanes have always represented a sweet spot for me. There is something graceful about the two-wing design that draws a bunches of RC pilots to it. I have had a few biplanes during my years in RC and continue to have fond memories of each of them. Recently I got the bug to put my Saito 60cc into a vintage bipe and after a short Internet search the Phoenix Model Waco went to the top of the list.
The Box
When you order the Phoenix Model Waco get ready for a serious case of box-shock, specifically how big it is. Opening that box and removing the Phoenix Model Waco components does nothing to mitigate the “big” perception.
All pieces are nicely wrapped in protective covering that delivered my Phoenix Model Waco in pristine condition. Hardware and some assemblies are packaged logically and enable assembly of this plane without midnight searches for a mystery screw. Most of the hardware looks to be of very good quality.
Included is a CG-checking mechanism that looks very much like the ones that came with AeroWorks planes, then called their CG Buddy. This one free “tool” that suspends the Phoenix Model Waco with one hand will make checking the CG way easier than trying to get this near 30-pound behemoth plane on popular CG checkers.
A surprise was finding a pair of painted pilot figures included that give the Phoenix Model Waco a higher level of cool. The large, removable open dual cockpits doubles as an expansive access point to the fuselage interior. I like that the cockpit has a pair of spring-loaded latches rather than screws. Those latches give us the option to hide the fuel filler and switch from view while retaining easy access.
Basics
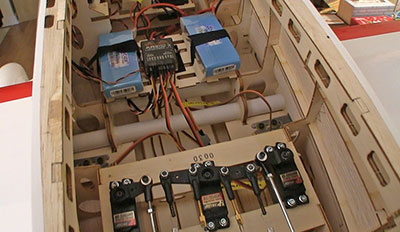 |
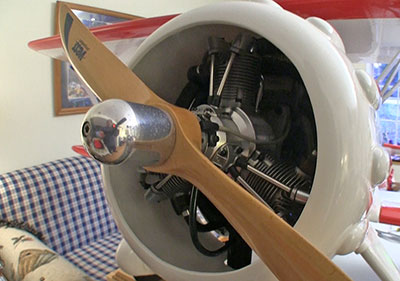 |
| The fuse interior (left) is spacious and gives lots of room for all that needs to be in here. A big reason for getting this Waco was to put my Saito 60cc Gas Radial (right) in the cowl. Click images to enlarge |
|
While inspecting the Phoenix Model Waco components I noted that the construction is robust. There is lots of structure where support is needed but there is also liberal use of laser-cut, weight-reducing “holes” where they do not compromise the integrity of the airframe. This is a great example of melding engineering and modern laser-cutting technologies.
The Phoenix Model Waco has a 90.5" (2300mm) main wing and an overall length of 73.7" (1873mm). All that wing area promises lots of lift, an important feature considering the (projected) 27.5 to 30lbs overall flying weight and the 60cc Saito radial I am dropping in the cowl. My Phoenix Model Waco weighed in at 26.4lbs, dry when complete.
Because the 90.5” wing span is less than a foot from being illegal on many of our nation’s highways, Phoenix wisely made both wings two-piece systems. Each wing is strengthened by ¾”-diameter aluminum tubes, four in the top wing (two per side) and two in the bottom wing. While designing our FlyingRC.net Protector Set for the Phoenix Model Waco I discovered that one of the wing tubes is longer than the wing panel in which it goes, so I had to design a separate wing tube bag for the six tubes.
Wheel Pants
If you have followed FlyingRC.net you know I am not a big fan of wheel pants, primarily because most are rather fragile, especially when subjected to hundreds of touch and goes of which I am a big fan.
The Phoenix Model Waco is a different animal in terms of the wheel pants. This plane is large enough that the 5.25" (135mm) diameter wheels and wheel pants seem to be sufficiently robust to withstand the effects of grass. Most important to me is that there is enough space between the bottom of the pants and the grass to help prevent entanglements there. So, my Phoenix Model Waco will sport the factory wheel pants and strut shrouds, at least until they begin to fail, if they do.
Minimalist Instructions
It didn’t take long for me to realize that the all-to-common poor instructions do not tell us how much of the molded landing gear fairing openings need to be removed. That means lots of fitting, taking everything apart and fitting again, repeat ad-nauseum. Also, these parts are thin plastic and very flexible. That means the heavy coat of paint chips off easily.
In the end the fit between the fairing components left me less than ecstatic. I wound up cheating the fairings towards the bottom of the plane to hide the terrible fit there. I fully admit that much of this ill-fitting may be in part due to my dislike of the fairings in the first place. I expect someone who enjoys perfecting scale appearance could do a much better job of this installation. I wanted to go flying.
Pull-Pull
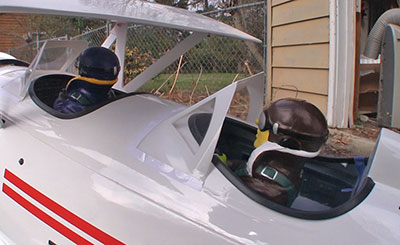 |
 |
| A nice surprise was finding the painted pilots (left) in the box that dress up the removable hatch. The kit came with a full set of stickers but I have been working with a machine in my shop and decided o make all my own graphics (right) for the Waco. Click images to enlarge |
|
The included pull-pull hardware that operates the rudder and tail wheel sucks. The cable ends have a plastic portion molded around the metal threaded rod where the cables loop through. When I first saw them I almost balked but made them up anyway. Then one of the plastic ends slid off the threaded rod when I moved the rudder and I jerked all of them out.
I keep a couple DuBro (#518) 4-40 Pull-Pull sets on hand for just such a situation. I made up the twin cable sets and installed them without issue. I really do try to use the included pieces when I build a plane for Review, but this was simple common sense (fear?) and the DuBro pieces gave me confidence that the rudder and tail wheel steering will work long term.
Tail Wheel
The steerable, 1.8" (47mm) tail wheel has an internal coil spring suspension with a knee link to keep the wheel straight. The tail wheel itself looks beefy and more than up to the task of supporting the tail. As is often the case, the mount connecting it to the airframe looks like it might not take too many hard landings. Of course, not many RC plane wheel systems will stand up to hard landings for long, so this is more on the pilot than design of the airframe.
Wing Struts
The metal wing struts that connect the outer ends of the top and bottom wings turned out to be another bit of trial and error fitting. The L-brackets that come with the kit are bent to a 90-degree angle but the top and bottom connecting points are offset a few inches which puts the struts at a big angle to the brackets. The instructions don’t say much about this and nothing about tweaking the bracket angles at all. I found that bending the brackets out several degrees let the strut align much better which in turn made getting the pins that secure them in place less likely to elicit adult language.
During assembly at the field I found it best to connect the struts to the top wing halves before mounting them on the plane. This just eliminates having to work “under” the top wing to get the struts installed if we wait until the wings are on the plane. Sometimes sequence is everything.
Servos
 |
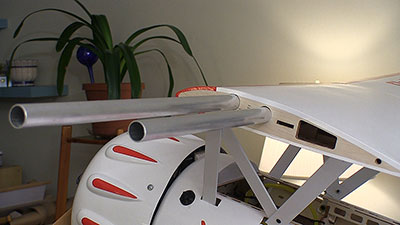 |
| Both the upper and lower wings are sectional (left) to make transport and handling easier. All wing panels are supported by aluminum tubes (right) to make this plane as tough as it is beautiful. Click images to enlarge |
|
I had heard of lazy roll rates with the Phoenix Model Waco so used a pair of HiTec HS-7954SH, 403oz (on 7.4V LiPo power) servos in the lower wing that operate the upper and lower ailerons. Another HiTec HS-7954SH was installed to drive the rudder and tail wheel. A pair of HiTec HS-5565MH, 194oz (7.4V) servos drive the elevator halves and throttle. I realize these servos are overkill to some degree, but I like to have extra power just in case. Plus, I had these servos on hand so skipped buying more new ones to keep the cost of this build down.
Engine Install
A big reason to get the Phoenix Model Waco was to house my Saito 60cc Radial gas engine. I hated to pull it out of my Top Flite Giant Scale P-47 but I had been getting requests for a biplane Review. The Phoenix Model Waco looked to be perfect for my needs. One of the first things that caught my eye was the nearly 11”-diameter round cowl. A plastic fake radial engine was included but stayed in the box. Not in front of my real radial engine!
Mounting the Saito 60cc Radial proved to be simple with no modification needed. I did drill holes for the fuel line and throttle linkage in the firewall but that was all that was needed. The Saito 60cc Radial and its Keleo Ring Exhaust fit inside the cowl like it was designed for it.
The Phoenix Model Waco came with a black plastic scale type, 3.7" (95mm) diameter spinner but at least initially I decided to use the aluminum, “old fashioned” spinner I always had on the Saito 60cc Radial. The plan is to start flying the Phoenix Model Waco with a Vess 22C (sort of a 10-pitch equivalent) prop.
Phoenix also provided a fuel tank, but I opted for a 24oz RotoFlow tank to be sure I had plenty of goofing around time in the sky. Overkill perhaps but I’d just as soon land a 30-pound biplane with the engine running.
CG
The final act in the building of the Phoenix Model Waco Review was balancing the plane. As you might suspect, balancing a 30-pound biplane can be difficult simply because it is so clumsy to handle. That makes getting it on most balancers correctly tough for a single person.
As I always do, the CG was set at the recommended location for the trim flights. I had heard stories of having to add 3lbs and more of lead to balance the Phoenix Model Waco. I was happy to find that my Phoenix Model Waco hung very level on the included CG “checker” without any ballast added. Perhaps the 4lb Saito 60cc Radial I used helped that.
Control Throws
 |
|
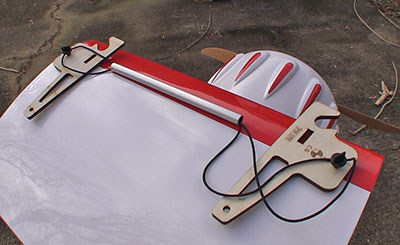
| The kit comes with this device (left) for checking the CG. That makes checking th CG accurately by yourself (right) possible. Click images to enlarge |
|
I set up all my planes with three “dual rate” configurations, all accessible through the G switch on my Spektrum transmitter. While I will have the “all I can get” throws on the “0” position of that switch I adjusted the #1 position to have the recommended high rates and the #2 position with the recommended low rates.
Some planes are more of a handful at the all-out throws, some particularly so at landing speeds. Following the manufacturers spec throws is just good practice if you value the plane itself or everything else in the area in which you fly. I can always dial the dual rates up or down later once I get some stick time with the Phoenix Model Waco.
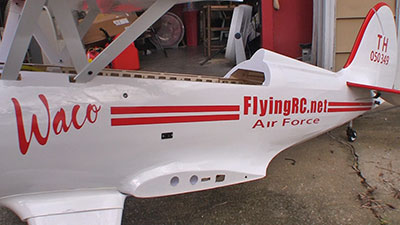
Graphics
The Phoenix Model Waco kit came with a full set of Waco graphics that would be just fine, but I have been working with a cutting machine in my shop so made up my own “stickers”. I paid for everything, so I don’t need to advertise anything but my site!
Final Prep
Once I was satisfied with the CG all that remained was getting the Saito 60cc Radial fired up to be sure there were no engine or fuel-related issues. I also wanted to be sure that I had the carb tweaked as close as possible and the throttle servo dialed in. this is also when we finalize the throttle servo settings.
When I get to the field, I would rather focus on flying the Phoenix Model Waco, not finishing setup tasks that were better done in the shop. Having to fully assemble the Phoenix Model Waco for checking the CG also lets me be sure that the assembly-related parts fit and that I have the needed tools with me when I assemble it at the field. I have readied a bunch of planes for their first trip to the flying field but go through this process with each of them. I have learned the hard way that paying attention to what I am doing in the final days of building a plane can save lots of time (and running back to the shop) when I get it ready for the maiden flights.
Coming Next
| Video Tour |
In the next part of this Phoenix Model Waco Review we will look at the maiden flights. I’m not expecting anything big in terms of adjusting but you never know until the plane leaves the ground. Some maiden flights are more exciting than others.
Have a comment on this Review? – Email Me!
Back to the Reviews List
All Flyingrc.net written, photographic and drawn materials are property of and copyright by Tom Hintz and Flyingrc.net 2013-2020 Materials cannot be used in any way without the prior written permission of the owner.
Privacy Statement