


Text, photos and video by Tom Hintz
Flight video - Clark Ponthier
Posted – 4-17-2018
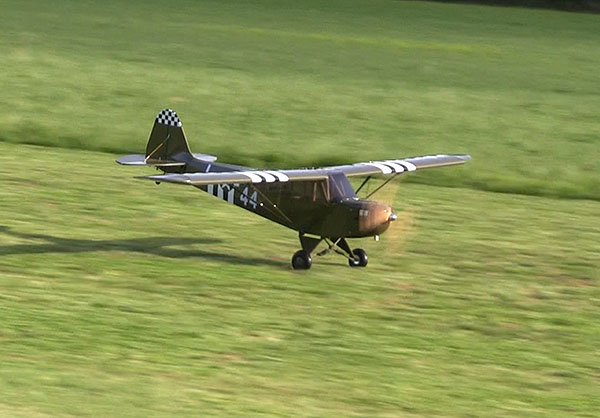
A friend recently suggested there is something unnatural about my infatuation with rudder-friendly planes. That left no choice but to slap this reputed friend/accuser down and take his lunch money. I still enjoy tearing holes in the sky with my higher performance planes yet think there is something elegant about a well-designed high-wing plane that responds predictably to application of the rudder, giving the airframe to expand the flight envelope beyond what seems natural. It should be no surprise that the Hemple ¼-scale L-4 Grasshopper could, with the help of an instructor, double as a giant scale trainer. Another reason for flying this RC plane is that I occasionally flew back seat in a similar full-scale Grasshopper in Vietnam going on 50 years ago!
The Hemple ¼-scale L-4 Grasshopper comes out of the shipping box (well protected) free of damage and sporting a nice covering job. Sure, you will need to tighten the covering up before you go to the field but that is on virtually any RC model plane. I was surprised at how little the covering loosened up during the weeks it sat on my bench during assembly. I shrunk the covering down once, the day before to the field for the maiden and all it took was 10 minutes with the heat gun and the little loose portions tightened up.
Not so common are the factory-applied military graphics. As with the covering itself, the application of the military markings/graphics is well done. Between the factory covering job and graphics application we can get to the flying field roughly a day sooner than with many ARF’s yet have a great looking model to show off. I’m thinking of telling everyone who hasn’t read this Review that I did the covering.
The hardware seems a bit oversized for
the L-4 so I had to sort out a couple
conflicts at the tail feathers.
The Hemple ¼-scale L-4 Grasshopper can be powered with 30cc to 50cc gas engines. In my first go-around with a Hemple ¼-scale L-4 Grasshopper I installed a DA50 engine and it seemed to be just too much engine for what I wanted to do with it. The DA35 I am putting into it should be more than adequate in the Hemple ¼-scale L-4 Grasshopper.
The Hemple ¼-scale L-4 Grasshopper has a wing span of 105”, is 72” long with a flying weight of about 14lbs. That is not a lot of weight for a wing this big. Between the wingspan and the thickness of the airfoil we can expect great slow to mid speed flying capabilities. The control surfaces appear a bit larger than scale, but I suspect that is to balance the look of the real Grasshopper with a bit more control performance a ¼-scale plane needs. Remember, there is no such thing as ¼-scale air molecules, so our models can benefit from slightly enlarged control surfaces.
One of the eye-catching features of the Hemple ¼-scale L-4 Grasshopper is the “greenhouse-like” array of windows that made the original full-scale design so effective as an observation platform. Even better news for the modeler is that all the windows are factory installed. All we must do is peel the protective film from the outer surfaces of each pane. We do have to install the pre-hinged upper and lower door (right side only) halves – after the radio and fuel gear is installed.
You would think that a ¼-scale, high-wing cabin would have lots of working space. If you are ¼ of normal modeler size, sure. Otherwise, not so much. There is an accidental bit of visual trickery that lets the eye perceive all those windows as “access” to the cabin. You can see the interior through those windows well enough but, getting both hands into the cabin means reaching in through the access door on the right side of the cabin.
This isn’t my first rodeo with a plane like this. Where the instructions call for gluing the large windshield in place I use screws. Being able to reach in through the windshield area greatly simplifies working inside the cabin, especially at the field.
The only access to the cabin is through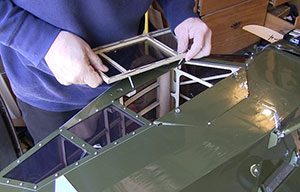
the side doors so I installed them last.
The Hemple ¼-scale L-4 Grasshopper comes with Cub-style articulated main gear and a spring-loaded tail wheel assembly. I have long been disenchanted with the spring-dependent style of tail wheel so replaced it with a Miracle Tiller Tail Wheel system. I think the tiller system offers positive-feeling steering, quick “re-alignment” (bend the tiller rod as needed) and the dependability of a simple system. Besides, I truly suck at getting those springs bent correctly to produce steering that goes where we want. See Resources below for a link to this tail wheel set.
This build originally used a different engine and that has been scrapped and replace by a DA35 and a full review of that engine and how i works in the L4 is up coming.
On the Hemple ¼-scale L-4 Grasshopper the fuselage is a bit narrower than the rear edge of the cowl. That allowed me to add wooden blocks at each of four mounting bolts to hold the back of the cowl open, creating considerably more exit area that is largely hidden from view.
Much of the hardware appears over built for a ¼-scale plane. I suspect that is because much of Bill Hemple’s product line is made up of 40 and 50% planes. Buying the hardware in large quantities gets Bill a break on the cost and allows the good hardware to find its way into the Hemple ¼-scale L-4 Grasshopper kit as well.
All the work that goes into flying a war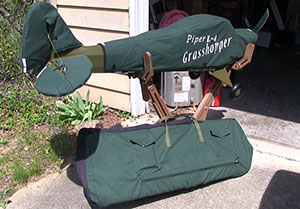
bird got me into making our FlyingRC.net
Wing Bags and Protectors.
We even find the raw materials from which to create carbon fiber tube-style elevator linkages, minimizing the weight while maximizing strength. The elevator servos and linkages are a long way back from the CG (center of gravity) so “adding light” at the rear reduces the piles of ballast that can be needed up front.
I had a spare set of carbon fiber tubes and titanium, 4/40 ends that I have been using for some time so replaced the kit versions. I know the titanium ends are lighter than steel ones but decided to pass on weighing them. I’ll let me bask in the glow of “adding light” a proverb for which my friend, Dennis is known.
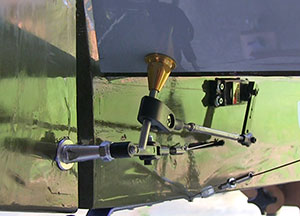
I found a conflict between the rudder control hardware and the elevator hardware that only happens at larger throws than is recommended in the manual, but this needs to be checked closely whenever you make a change at the rudder or elevators. At the larger throws certain stick positions can cause the rudder elevator hardware to make contact, never a good thing.
The wings need to have the strut assemblies built and installed, which can be a source of frustration if you do not download the instruction manual for the Hemple ¼-scale L-4 Grasshopper. See Resources below for a link to that (PDF) manual.
Installing the struts takes a bit of fitting and tweaking but we wind up with a tough, functional strut system that easily folds down for transport. The FlyingRC.net RC Plane Protector Set for the Hemple ¼-scale L-4 Grasshopper comes with custom-made covers for the bare end of each strut, so the raw edge of the aluminum tubing won’t wear on the inside of the wing bag.
The struts use 6/32 hex-head screws so having a 6/32 tap on hand to chase the threads built into the wings makes assembly a bunch easier. I loosely assembled each strut completely, then after checking the fit to the wing went back through to add Loctite and tighten everything down. This let me fine-tune the position of the brackets to eliminate binds in the strut assembly when moving it from functional to stowed.
The folding wire fits into simple wrap-around retainers. I found that if I expanded the retainers a bit it improves the fit and makes it easier to get the wire ends free of or re inserted into the fittings.
The struts attach to a tab which is mounted just forward of the rear landing gear mounting point. It is important to note, as stated in the instruction manual too many won’t read, that the tab must be shaped to fit the aerodynamic tube. This isn’t a big deal to do but it hugely frustrating if you don’t catch this in the instructions.
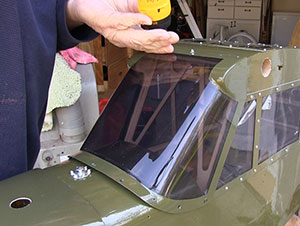
I screwed the windshield in place rather
than glue it so I could remove it to work
in the interior.
I used a Spektrum AR9110 Powersafe receiver with a pair of 7.4V, 5000mAh LiPo packs for the servos and ignition. The original switch that came with the AR9110 Powersafe receiver was used and mounted just inside the lower cabin door. I used all Hitec, high-voltage servos with one HS-5585-HV on each aileron, a HS-5565 on each elevator half and one more on the rudder. The throttle uses a HS 5466MH servo.
Ignition kill is handled by a Tech-Aero IBEC, powered through the receiver and set to deliver 6.6V to the engine ignition box. I normally put the Tech-Aero IBEC on the trainer button to prevent accidentally bumping a toggle switch and shutting the engine off when I don’t mean to. I decided it would be more important to not engage the electric starter by accident so put that on the Trainer button and the Tech-Aero IBEC on the H switch my Spektrum DX9 transmitter.
All the radio components with the exception of the elevator servos came out of another plane that had been flown a bunch, so I was not concerned with their reliability. On maiden day at the field, I did my usual range check that exceeds Spektrum's minimum by quite a bit. If 30 paces are good, 50 paces are better, and it checked out fine at longer range on the reduced signal.
Once again, the North Carolina maiden weather gave me a warm but windy Saturday with lots of rain predicted for Sunday. So far 2018 has been terrible for flying, particularly maiden flights but my reduced ability to get to the flying field during the week forces me to fly in more wind than I would like.
After getting the Hemple ¼-scale L-4 Grasshopper assembled, range checked, and all of the controls observed to be sure everything was going in the right direction I started the engine to get that warmed up. With the help of my friend Dennis who did most of the tuning we had the idle stable and the high end just a little rich.
On the first taxi onto the runway the liability of a wing that generates huge amounts of lift showed itself. A stout crosswind gust “flew” the left (upwind) wing up enough that the downwind wing acted like a kickstand and prevented the Hemple ¼-scale L-4 Grasshopper from flipping over completely. Not a great sign. I also was having some trouble steering and was not sure initially if it was the crosswind or a mechanical issue. I would later find that I had not tightened a setscrew on the Miracle Tail Wheel. Later, after tightening that setscrew the Miracle Tail Wheel worked fine and the Hemple ¼-scale L-4 Grasshopper had good, responsive steering.
For first takeoff I tried rolling the throttle on to let the Hemple ¼-scale L-4 Grasshopper accelerate flying speed. The Hemple ¼-scale L-4 Grasshopper simply does not like gradual throttle application, in the wind anyway. I did get it in the air for the maiden, but it required a couple takeoff runs as I tried to figure out what it wanted. The problem was I had no idea if I had flown it off the ground or if the gusty winds had added enough airspeed over the wing to fly.
As so often happens, the winds 50 or so feet above the ground were far worse than on the runway. That meant the Hemple ¼-scale L-4 Grasshopper was bouncing around, making it nearly impossible to get a decent trim established. I had plenty of control throw so continued flying around the field to get a feel for the Hemple ¼-scale L-4 Grasshopper. The idle was stable enough that I tried some low power passes in the wind and while the Hemple ¼-scale L-4 Grasshopper did get mushy when slowed too much, the throttle picked up smoothly, so a little shot of power brought the feel of the controls right back.
I tried shooting some approaches to learn what it was going to take to get the Hemple ¼-scale L-4 Grasshopper back on the ground. Into a stiff wind it needed just a little throttle and a touch of down elevator. I suspect in decent wind conditions the down elevator may not be needed or I could dial in a little bit in an F Mode, as I usually do anyway.
So, the Hemple ¼-scale L-4 Grasshopper performed well in lousy conditions which makes me hopeful about how this plane will be in more moderate conditions. I did not try the rudder too much because the buffeting winds were picking wings up making it hard to tell if cross control was needed and if so how much. A few times I got into what seemed to be a temporary low wind condition and the Hemple ¼-scale L-4 Grasshopper seemed to like the rudder. All the controls felt reasonably solid but flying in lighter winds will show the true flight tendencies though I can’t imagine anything would be worse than in the gusty winds we have on Maiden day.
FlyingRC.net Protector Sets - Click Here
Miracle Tail Wheel Kit (Valley View RC) – Click Here
Tech-Aero IBEC (ignition battery eliminator circuit) – Click Here
Hemple ¼-scale L-4 Grasshopper Instruction Manual (PDF) - Click Here
Have a comment on this Review? - Email Me!