The springs that came on the new gear were too
strong so we decided to make bungees.
Suspension refinement for Cub-style main gear
Text, photos and Video by Tom Hintz
Technique by Dennis Shaver
Posted – 3-19-2020
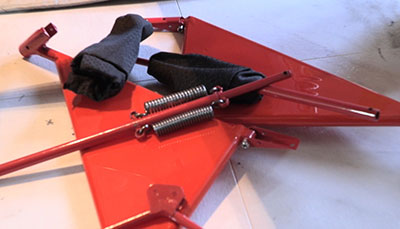
Main landing gear with built-in suspension is popular on many high-wing RC models like Cubs. Now the popular Hangar 9 110” Timber was manufactured to be compatible with the optional sprung undercarriage for the Hangar 9 XCub 60cc, Carbon-Z Cub 2.1m (#HAN526024) including factory-installed mounting hard points.
While sprung landing gear is attractive, especially on planes like the Cub and Timber, there appears to be a hitch in the spring-along with the XCub version. The factory-installed coil springs are more heavy-duty than seems necessary. Plus, we have been hearing about those springs stretching on relatively hard landings that caused no other damage to the plane this side of a busted prop. There had to be a better way.
Old Idea New Again
Replacing springs with bungees is not new but it has been refined. A good friend of mine, Dennis Shaver has used the bungee idea on many larger planes and has reduced the process to a simple elegance. Using one, long bungee wrapped back and forth in place of the springs can work but it is very difficult to install in a way that it remains taught and even tougher to fine-tune. As usual, Dennis had a simple solution and agreed to show us how.
Materials
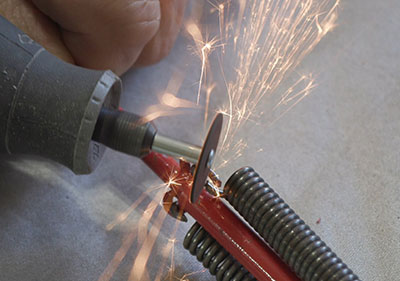
I could not clip the springs with side cutters so resorted
to my trusty Dremel.
To make the change from spring to bungee we need a few things, in addition to the spring undercarriage gear. We used 1/8” bungee cord and 0.0253” safety wire. Small zip ties might be tempting for securing the ends of the bungee, but safety wire works best. I bought 30 feet of the bungee and a 1/4lb spool of wire. Both will last for years and years, shrinking the cost-per-use to who-cares levels. You can do this with any decent pliers but there are purpose-designed safety wire pliers that work even better, and way easier. You can get them for under $30 in lots of places that sell tools. It’s a new tool for the shop, that makes it a no-brainer.
The Mod
First, we must get the factory springs off the telescoping struts. That is not as easy as it sounds. They are surprisingly tough and refused to succumb to my biggest side cutter. I dug out my Dremel with a cutting disk and carefully cut the ends of the springs. The springs are almost relaxed with the struts collapsed so there was no big release of stored energy but be careful just in case.
The springs were attached to hex nuts brazed to the side of the strut tubing. During painting those nuts got a bunch of paint in the threads so I got out a M4X0.7 tap (some of these struts may have 3mm nuts, check first!) and ran that through the nuts to clean the threads. Then I screwed M4 X25mm bolts into the nuts halfway and added a nylon insert nut on the end. A drop of thread locker at the nuts helps secure the bolts in that position.
Making the Bungees
Dennis found that four, 10”-long bungees per strut worked best on his Hangar 9 110” Timber. The good thing about this system is that you can always try a slightly different combination if your situation might benefit from less or more tension.
After cutting the four 10”-lengths of bungee, use a lighter to melt the ends a bit. All this does is prevent unraveling though when complete, they can’t unravel far anyway. I cut four pieces of safety wire roughly three inches long with which to secure the ends of the bungees.
A safety wire pliers makes twisting the wire easy. You
can do it with regular pliers if you are patient.
I have a small hobby vise in the shop and that worked great for holding the bungee with about ½” of the ends above its jaws. That frees up both hands to wrap the wire around the bungee ends snug before twisting the ends to tighten it up. You twist the wires with regular pliers but a safety wire pliers is way faster and a bunch cooler. However, while being cool with the safety wire pliers, pay attention to how tight the wire is getting around the bungee ends. There is a considerable amount of force developed by the wire as it tightens around the bungee so pay attention or you might cut the bungee by accident.
I tried the fabric “boots” that covered the original springs and found while they do fit over the bungees and bolts, it’s not by much. I decided to leave them off as I think the “boots” could tighten up on the fabric “boots”, effectively increasing the spring rate, perhaps substantially. Also, I am not against showing off my bungee handiwork via Dennis Shaver.
You will notice that my suspension undercarriage is now black rather than the original red. The red covering on the gear did not match the plane covering very well. As so often happens, a small mismatch sticks out far more than a bunch of contrast, so I removed the covering and the sticky mess it left behind (I used Goo Gone with abrasive pads) and painted the assembly satin black.
Axles
The suspension undercarriage comes with a pair of very stout axles, held in with set screws. I didn’t like the diameter, weight and method of retention. Not surprisingly, Dennis had another idea. He turned the threaded end of the axles included with the Hangar 9 110” Timber kit so they fit into the boss at the end of the sprung gear. Lacking a lathe, I opened those bores a bit and tapped them to M11X1.5mm. The axles screwed in fully and with a bit of thread lock and the original set screws, they are staying put.
Conclusions
At $59.99 (3-16-2020) the suspension undercarriage is not cheap but its function, particularly with the bungees, could help protect the fuselage from the damage of rolling fixed gear out on a less than perfect landing. Also, the aluminum gear that came with the Hangar 9 110” Timber seems soft enough that a single blown landing can allow the prop to strike the ground which means another $20 or so down the tubes. I strive for landing perfection but consistently show myself the need for more practice, hence my incessant touch and goes.
All Flyingrc.net written, photographic and drawn materials are property of and copyright by Tom Hintz and Flyingrc.net 2013-2024 Materials cannot be used in any way without the prior written permission of the owner.