|
|||||


FlyingRC.net is a
Veteran-Owned site.

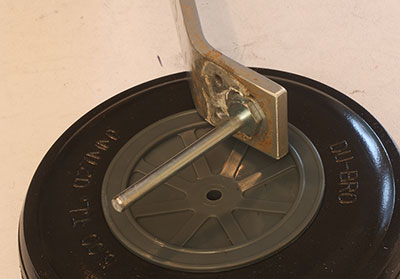 |
| There are few things in RC flying that an twist your stomach like seeing a wheel fall off. If it didn't happen in the car on the way to the field, you are in big trouble. Click image to enlarge |
Wheels Falling Off
Simple problem, complicated damage
Text, photos and video by Tom Hintz
Posted – 2-26-2019
There are few things in RC flying that can launch the sickening feeling of impending doom like a wheel falling off. No matter if it departs on takeoff, in flight or when landing, the result is usually complicated damage to the fuselage and often the wings. A recent brain-fade on my part involved me closing the choke in flight and rolling the main landing gear out of the fuselage when I tried to deadstick it in a very wet field. The resulting damage looked much like what occurs when a one-wheel-short landing gear digs into the ground. I screwed up, you get another How-To.
When a wheel falls off the axle the now bare landing gear leg sports edges more apt to dig in than slide on whatever surface is encountered. The forces that digging in generates easily overcome the strength of even well-made airframes. As the gear breaks free it often “rolls” under the fuselage and jams the ends of the gear into the bottom of low-wing planes, causing extensive damage. With the wings and fuselage damaged repairs can get exponentially more difficult. That can make the price of a new plane a more attractive option.
Little Dimples
The dependability of the steel wheel collars meant to secure the wheels can be enhanced with a simple modification to their installation. The fellow who taught me to fly filed little dimples in the axle where the wheel collar set screw is tightened down. That little dimple helps lock the collar in place even if the set screw loosens up a bit. If nothing else, it gives us a chance to find the problem before the wheel falls off altogether. A little blue Loctite on the set screw can in many cases prevent that loosening. But I still make the dimples in the axles.
It is important to exercise restraint when making the dimples. They do not have to be deep. In fact, make them too deep and in addition to weakening the axle, the set screw can extend too far out of the wheel collar to the inside and either fall out or get pulled out because it only engages a couple threads.
I have seen axles where the builder ground a flat over the full length of the axle. That does give the set screw a surface to seat on, but it also creates edges (even when rounded) that increases wear on the inside surface of the wheel hub. If the flat is consistent across the axle a slightly loose collar can still work its way off.
 |
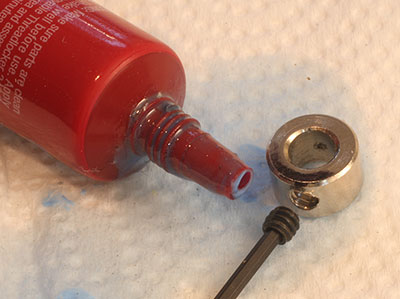 |
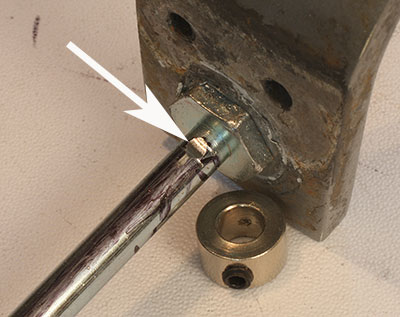
| Grinding a small dimple in the axle where the set screw seats (left) can save the day, and the plane. Adding a bit of blue Loctite to the set screw (right) is also a very good idea. Click images to enlarge |
|
To be sure I have room to place the collars, wheels and washers I buy axles at least 2”-long and trim them to final length if need be after figuring out where the outside collar goes. In the case shown here I only cut off around ¼” of axle more out of habit than necessity. Use your best judgment on trimming axles.
Location
On planes with no wheel pants I install the wheel collars with the set screws facing up. When wheel pants are used, I point the set screws down where they can be accessed more easily.
This process locates the dimples so that the collars are properly spaced to keep the wheel in place and not moving laterally on the axle, even a little. Factored into the collar placement is two flat washers on either side of the wheel. They help prevent wear to the plastic hub where it would rub on the collar itself. Adding two washers lets the washers spin with the wheel, eliminating most of that friction and the resulting wear.
The inside collar must be placed so that it prevents the wheel or tire from rubbing on the landing gear or wheel pants. Before placing the inner collar, I color the top of the axle with a marker. Install the collar again and run the set screw down until it just touches the axle. Turn the collar on the axle back and forth so the set screw makes a mark in the coloring on the axle, marking where the dimple needs to be. Remove the collar, grind that dimple and then install the collar with blue Loctite on the set screw this time.
I find it helpful when installing the collars to rock them back and forth slightly as I tighten the set screw. This helps be sure the set screw is in the dimple before tightening it fully.
Next install two washers against the collar, the wheel and two washers against the outside of the wheel. Color the top of the axle with the marker before putting the outer collar on and making the mark with the set screw as with the inside collar. Remove the outside collar, washers and wheel before grinding the outside dimple at the mark.
Clean up the axle, re install the wheel and washers, apply blue Loctite to the outer collar set screw and install it, rocking it as you tighten to be sure it is in the dimple.
Video Tutor |
I know some will see this as more work than is necessary to install wheels. For those who have had to try landing a plane after a wheel fell off, the additional work is well worth the effort. Those wanting to avoid attempting trick one-wheel landings and the repair that usually follows are also likely to see the benefit of this precautionary but common sense assembly work.
Have a comment on this How-To? –Email Me!
All Flyingrc.net written, photographic and drawn materials are property of and copyright by Tom Hintz and Flyingrc.net 2013-2020 Materials cannot be used in any way without the prior written permission of the owner.
Privacy Statement