Unpacking a new model is a good time to check
everything out and make a list of what still needs to be
purchased.
Text, photos and video by Tom Hintz
Posted – 2-23-2020
The Plan
It shouldn’t be surprising that FlyingRC.net receives lots of ideas from its viewers. Good content ideas are always welcome, and requests for How-To content are always near the top of the heap. This time however, the requests bordered on demands. Once again, the FlyingRC.net viewers were correct. This Review segment begins my response to the “demand” for a multi-part, detailed look at a plane and the building process. This series is based on my new Hangar 9 110” Timber, another popular design from the folks at Hangar 9.
Before someone asks, I bought the Hangar 9 110” Timber myself. It was not supplied by Horizon Hobby or Hangar 9.
It is important to note that this series shows what works for me. It is my intention to put ideas in front of the masses to get you thinking about how you do things and perhaps provide a couple ideas that apply to your process.
The Basics
The Hangar 9 110” Timber has a 110” wingspan with 1466 sq in and a projected flying weight of 17 - 19 lbs. Though my normal practice is to overpower my planes to some degree, I am going with a DA35cc on the Hangar 9 110” Timber despite it being rated for up to 50cc. With enough power the Hangar 9 110” Timber is capable of hovers and other 3D thrashing. I want my Hangar 9 110” Timber to be more of an everyday, rudder-friendly, sort of slow flier. I think this power-related restraint will also put this Hangar 9 110” Timber project squarely in the ballpark for way more FlyingRC.net viewers and that is important to me.
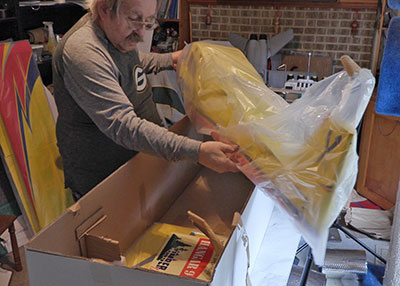
Unpacking
Over the years I learned the hard way that the assembly process can be made less frustrating by keeping track of everything that comes out of the shipping box, as it comes out. I find a small box in which to put all the hardware and small parts to keep the easy to lose stuff together. I’m convinced lots of the “missing” pieces modelers complain about are really lying around someplace in their shop, the location of which is long since forgotten following the always enthusiastic unboxing.
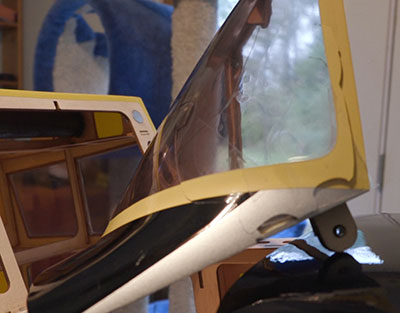
This is the first damage I have found in a Hangar 9
plane and Horizon made good on it.
The unpacking process also lets me check the included hardware and pieces over to see if I might want to replace some of them with aftermarket pieces. Case in point is the spring-operated tail wheel included with the Hangar 9 110” Timber. While this is admittedly a personal preference, I always replace these spring-loaded frustration causers with an aftermarket tiller style tail wheel. I think tiller systems are easier to install and way easier to keep aligned even when I do a touch and go more sideways than anticipated.
The Hangar 9 110” Timber comes with good looking turnbuckle and ball joint linkage pieces, so I won’t have to spend more money replacing those. Hangar 9 also has many of the assembly bolts installed at the factory which dramatically reduces the searching for the right size for each use. Even the wing bolts come screwed with fully into the wings. That is a good thing, if you screw them in all the way. Turn the wing bolts in less than all the way and the next time that end of the wing bumps anything the blind nut secreted within the wing is likely to pop out.
The covering emerged from the box in surprisingly good shape. Some work with the iron and heat gun will be needed before going to the field but even that is less than I anticipate with a plane coming from the other side of the world.
Windshield Busted
The Hangar 9 110” Timber has a removeable windshield, secured with magnets and optional bolts for the more exuberant fliers. My windshield came from the box hopelessly busted, and apparently, I am not the only one who found this. A friend who also has the Hangar 9 110” Timber said his windshield also dead on arrival. In both our cases, Horizon made good with new windshields.
Since this is the first real damage I have found in a Hangar 9 plane, gnashing of the teeth will not be necessary for those of us who recognize the potential problems the real world holds for mass production of anything.
Landing Gear Options
The Hangar 9 110” Timber comes with 6-1/4” tundra-style wheels which will handle a wide range of terrain. The “tires” are made from some sort of plastic, closed-cell foam so they are very light but lack the forgiveness of an inflated tire. I will probably use the included tires initially but may change to the large DuBro inflated balloon tires later if the extra pound or so they bring if I don’t think power will be an issue.
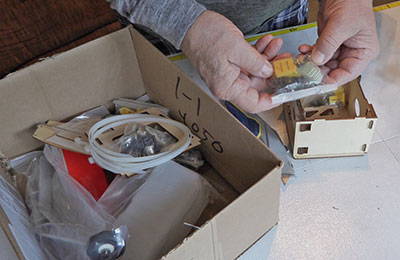
Putting all the hardware and other small parts into a box
helps me find them when needed. I've not lost any
parts since I started doing this.
The formed aluminum landing gear is very light, but I have heard that they are easily bent if the landings are not spot on. After unpacking, they do appear (to me) undersized somewhat for this size plane. The good news here is that the hard points are factory installed to use the Sprung Undercarriage from the Hangar 9 CubCrafters XCub (HAN526024). I am hoping the reduced weight of the DA35 as opposed to a 50cc engine will offset some of the additional weight of the Sprung Undercarriage assembly.
Hinges
The Hangar 9 110” Timber comes with most of its hinges installed and glued. I’m not complaining, rather I was pleasantly surprised. To keep the shipping box more reasonable the rudder needs to be installed and its pin hinges glued.
The flaps have full-motion hinges so we can program the Hangar 9 110” Timber to use flaperons. The size of the ailerons and flaps enhance the Hangar 9 110” Timber control response throughout the flight envelope. If you are into creative mixing, full motion flaps might add to the potential versatility.
Instructions
While cruising the instruction manual I check the specs to see what kind of (and how many) servos will be needed. Also, how many servo extensions and what lengths are used. Of course, if we change the location of a servo, like the throttle servo, a different extension may be needed.
Other things to think about is where the radio On/Off switch will be installed. In most cases, we need an external fuel filler inlet and a place for the vent line overflow to exit the fuselage. Small things to be sure but ones that can ruin a maiden day if forgotten.
CG-Aware Building
Whenever I hear of CG-related issues with a plane I am building I try to place components during construction to minimize the amount of added weight that might be needed to hit the center of the CG range where I always set my new planes. This is especially true when I hear of such an issue from someone, I know is a good builder.
Usually this kind of building plan means keeping our options open when it comes to placing things like batteries. Most planes have set places for the servos, but we can tweak where we place the receiver, ignition module and batteries.
I may not be able to eliminate added ballast entirely, but I can often reduce the amount of added weight substantially. Installing necessary weight as far from the CG point as possible reduces the amount needed. Every ounce of overall weight we save enhances performance to some extent, so it is worth a little thought and planning along the way.
A Search in Time
Throughout the early phases of building a plane I will do Internet searches for posts or videos from other owners that have come across problems or discovered better ways of doing something. I think the worst thing we can do is believe that we already know everything about building this or any other plane. Every time we open a new airplane box there are opportunities to learn a little more about this hobby.
All Flyingrc.net written, photographic and drawn materials are property of and copyright by Tom Hintz and Flyingrc.net 2013-2021 Materials cannot be used in any way without the prior written permission of the owner.