|
|||||


FlyingRC.net is a
Veteran-Owned site.

 |
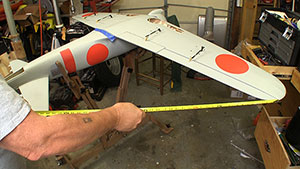
| Squaring the wing might not be all that much fun but it can make days at the field lots more fun when your plane flies right! Click image to enlarge |
Squaring the Wing
Straight and square equals flying right
Text, photos and video by Tom Hintz
Posted – 9-18-2015
There are few points in the construction of an RC plane that are as crucial as seating the wing. Even small miss-alignments can reduce the overall flight performance of a plane. But get the wing, fuselage and tail feathers properly aligned and the plane flies smoother and more predictably.
The ESM 88” Zero instruction manual is ineffective at best in its description of the wing installation process but the good news is that this, like virtually any airplane requires the same alignments and procedures. Any plane can have individual challenges to this procedure and the ESM 88” Zero showed that as soon as I set the completed wing in the saddle. The wrap-around portion at the front of the saddle appears to vary left to right in how it was molded. While that makes fining dead center there difficult we really don’t need to with this plane.
The rear of the wing saddle is essentially straight forward so I used a centering rule to find that point and marked it on some masking tape along the edge of the seat. As long as we can be accurate with centering the trailing edge at the wing seat finding the center at the front of the wing unnecessary. Later we will establish the real wing center at the leading edge that makes the wing square to the tail feathers. Square First
 |
 |
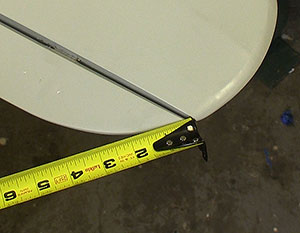
| Measuring from the tip of the aileron (left) to the edge of the horizontal stabilizer (right) makes it easy to be accurate and repeatable. Click images to enlarge |
|
I know that some feel we should make the wing level with the horizontal stabilizer first but I think you are better off squaring the wing first and then checking to see if it is parallel to the horizontal stabilizer. Depending on the amount of correction needed to get the wing square its new position can make it look very different when checking to see if it is parallel to the horizontal stabilizers.
With the wings trailing edge centered on the seat I measure from the outer tip of the ailerons to the trailing corner of the horizontal stabilizer. I use these corners because it is easy to repeat and you get a good “sight picture” that allows us to be very accurate. We want this dimension to be identical on both ends of the wing. To correct it just rotate the wing slightly against the trailing edge of the seat until the measurements on both ends of the wing are the same. If the wing fits the seat loosely it may help to tape it down so it does not move when measuring the ends.
When the wing is square to the horizontal stabilizers the trailing edge center mark should still be aligned. Now add a witness mark at the leading edge so that we can get the wing back into alignment while finishing the installation.
The wing on the ESM 88” Zero has dowels on the leading edge plus it is captured by the shape of the fuselage at the forward end of the wing seat. This makes laying out the dowel holes in the fuselage a little more involved but with a little patience it was done. Then I can install the wing, aligning the center marks and check that it is still square to the horizontal stabilizers. When satisfied with the wing position I drilled the two holes for the wing bolts at the trailing edge seat. Insert the bolts, snug them down and measure once more to be sure the wing is still square.
Parallel
 |
 |
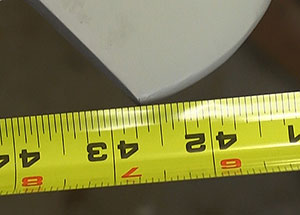
| I use the center of the wings trailing edge (left) as the pivot point to correct differences in the left and right measurements to get the wing perfectly square. Click images to enlarge |
|
Now we can hold the fuselage up to see if the wing is parallel to the horizontal stabilizers. This is complicated slightly on the ESM 88” Zero because the main wing has dihedral in it. I look at the plane from the rear with my eye on the centerline of the fuselage. Tilt the plane up or down so that the horizontal stabilizers appear to be just touching the underside of the wing tips. This is tough to do in a photo or video but simple to do with your eyes.
If the wing is not parallel to the stabilizers you can remove material from the low side or add material to the high side of the wing seat to correct. Remember that the amount of correction at the seat will be roughly half of the amount of error because changing one side of the saddle moves both wing tips.
How you make the correction depends on the plane. If you have a wooden wing seat it might be easiest to remove a little material from the low side of the wing to rock it into alignment. With a fiberglass wing seat as found on the ESM 88” Zero adding foam tape to the high side of the seat can help. I also have put plastic food wrap over the wing at the seat and laid a good-sized bead of silicone sealer to the wing seat, install the wing bolts and tighten until the wing is parallel to the horizontal stabilizers. Let the silicone cure, remove the plastic wrap and reinstall the wing to check the adjustment.
When the adjustment needed is small, say in the 1/8” amount at the seat (which is actually a sizable change for a wing saddle) I might fly the plane a day or two to make sure that everything is “settled in” before doing anything permanent. Planes do seem to “get comfortable” after a little flying so keeping track of this condition could prove beneficial.
Getting the wing perfectly aligned increases the build time somewhat but can dramatically impact how the plane flies. A miss-alignment might be easiest to see in maneuvers like a loop but this kind of error impacts flight virtually any time elevator is used.
Video Tutor |
Have a comment on this story? –Email Me!
All Flyingrc.net written, photographic and drawn materials are property of and copyright by Tom Hintz and Flyingrc.net 2013-2020 Materials cannot be used in any way without the prior written permission of the owner.
Privacy Statement