


Sometimes it is the local uber-tech guy that comes up with the best high-tech ideas.
Text, photos and video by Tom Hintz
Flight video by Clark Ponthier
Posted – 5-18-2017
One of the things that really turned me off to FPV (first person view) flying during my first foray into this world was the interference-prone, unstable video signal that seemed to plague nearly everyone involved. I got fed up, sold all my FPV stuff and went back to tearing holes in the sky with my line-of-sight gasser planes. Then along comes Alvin, a guy in our club who developed a way to capture a stronger, cleaner video signal and here I am again, this time with his Simple Tracker Pro technology and my FPV world is a much kinder, more enjoyable place.
If you are looking for an in-depth technical description of the Simple Tracker Pro this won’t be it. I looked inside and there is a circuit board with chips on it which automatically puts this far outside my range of technical expertise. Most importantly, Alvin understands it, he designed it and with several Simple Tracker Pro’s in frequent use at our flying field, it is obvious that the Simple Tracker Pro works.
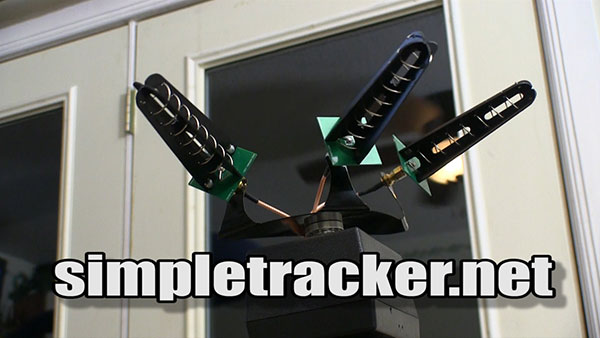
As I understand it, the three high gain antennas on the rotating head of the Simple Tracker Pro are at the heart of this system. The outer two antennas “bracket” the video signal being emitted on your frequency from your vehicle and that keeps the center antenna aimed at your video transmitter, hence the strongest, cleanest signal. I should note that the center antenna does not remain perfectly aligned with your FPV vehicle but rather close to it as the Simple Tracker Pro continuously updates the location of the incoming video signal on your frequency. The video signal coming from your vehicle is not a tight beam but rather dispersed. The Simple Tracker Pro uses the bracketing of the outer antenna to keep the center receiving antenna in a “sweet spot” that helps maximize the incoming signal to give you the cleanest video possible in that environment.
Because FPV flying is seldom confined to a small area the Simple Tracker Pro follows the signal wherever it goes. To avoid wrapping the antenna and other wires around the tripod the Simple Tracker Pro has an automatic point at which the rotating head spins back around to recapture the signal. This “re wind” happens quickly and so far, I have not seen any degradation of the video signal when it does happen.
The three antennas combine to track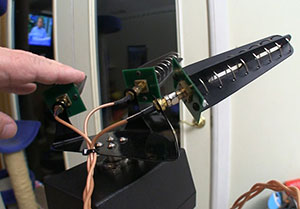
the aircraft with the center one. The
outer antennas are tuned to be a little
behind and a little ahead of the craft.
The antennas used on the Simple Tracker Pro are also important. Most FPV folks are flying using omni-directional antennas with gains of approximately 0.7-1.0 dbi. The helical antennas used on the Simple Tracker have a gain of 11+ dbi. That’s a lot of antenna power that remains focused on (or very near) your FPV vehicle.
You will notice that there is also a single regular, circular antenna on one of the receivers on my Simple Tracker Pro. This is a “just in case” antenna to capture the video signal when it is getting a better feed than the other antennas. This seems to happen most when the FPV vehicle is very close to the Simple Tracker Pro but that can be important also as it can prevent flying blind, even for a short time.
Powering the Simple Tracker Pro is done with an on-board battery. 3S to 4S LiPo’s are common and do the job well. The actual battery usage of the Simple Tracker Pro is surprisingly low. I power my Simple Tracker Pro with a 4S, 3300mAh LiPo pack. After a recent full day of flying I had over 95% of the capacity remaining in the battery!
There really is very little setup needed by the Simple Tracker Pro. The downloaded instructions walk you through building and tuning the Simple Tracker Pro. Since getting my Simple Tracker Pro tuned I have done nothing but plug it in and turn on the receivers. All the complicated stuff is inside where it doesn’t frighten me.
The receivers must be set to your frequency using the buttons on the front of each one. Once the frequency is set the receivers “remember” it so when you turn them on the next time they are already tuned in to your vehicle. I fly all my FPV craft on the same frequency which helps avoid confusion at the field amongst the people I normally fly with at the field and that my Simple Tracker Pro needs only to be turned on and it is ready to go.
Simple Tracker also offers a nice 3D printed pan/tilt (head tracking) mount mechanism that comes with components to build it several different ways to best suit your application. You can get the Pan Tilt Mount setup with or without servos. On line instructions show the different arrangements possible with this kit.
I should note that I unintentionally stress tested the Simple Tracker Pan Tilt Mount setup when the camera pod fell out of my Hobby King Tundra when I went inverted about 100 feet up. The assembly fell into a field and though a bit dirty, the camera and the Pan Tilt Mount components survived just fine.
The Simpletracker is compatible with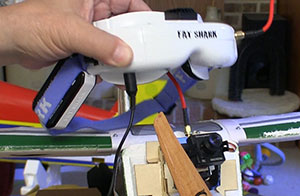
head tracking goggles.
Setting up head tracking in the transmitter (I use the Spektrum DX9) is a little counterintuitive but I found a good video on that process. See the link below. An important part of that process is making the sliders on the back of the DX9 the manual controls for head tracking. This way you must “turn on” head tracking with a switch but if head tracking fails, you can turn it off and return to straight ahead view. By using the sliders, you can still look to either side or up and down but you must return to center manually. During the setup for this I made sure the sliders were in their detent positions that mark the center of their travel. That way I can “feel” when the slider is back at center.
Another important point regarding the FatShark head tracking is the apparent lack of quality in the cord that connects the head tracking module to the transmitter. These cords have proven to be so fragile that many users buy several at a time, me included. To date, (5-16-2017) I am not aware of an after-market cable that works and is more durable.
The Simple Tracker Pan Tilt Mount sells to $18.00 (5-12-2017) or you can add two servos to it for an additional $8.00 for a grand total of just $26.00 for the whole outfit. You do have to supply the head tracker board for your goggles. See the Simple Tracker Pan Tilt Mount product page at the link below for more details.
Visit the Simple Tracker Pan Tilt Mount web page – Click Here
Setting up head tracking in the Spektrum DX9
We have to plug the video out cable from the Simple Tracker Pro receiver to the goggles and make sure that the goggles are set for that video input. After that you focus on flying and marveling at the clear video picture you are seeing. The Simple Tracker Pro does not overcome all interference but comes closer than anything else I have seen. At our field, I might still get a very light set of lines across the screen on one end of the field but they are light enough to be hard to see if not looking for them. Without the Simple Tracker Pro when flying through that part of or airspace it is not uncommon to have video go nuts for a while if not dropping out completely.
It is important to note that the Simple Tracker Pro does not clean up or improve the video signal coming from your FPV vehicle, it is not designed for that. What it does do is to keep the signal coming to your goggles stronger and way more consistent. I think that the image I am seeing in my Fat Shark goggles is better than without the Simple Tracker Pro but the goggles themselves limit the quality of the image to reduce latency.
The biggest “adjustment” I had to make when I started using the Simple Tracker Pro was not worrying about the next video black out or the sudden disruption by lines or other interference-related corruption of the image. It took me a little while to get used to the idea that I can use the entire airspace our field offers without fear that my video will fade to black. The more adventurous FPV pilots at our field are flying behind a line of trees that forms a “track” they can follow as part of a course they set up with gates and flags around the field. They keep flying this course without little to no video interruption, something that would be fool hardy without the Simple Tracker Pro.
An unintended but valuable capability of the Simple Tracker Pro comes when you lose radio signal (not the video signal) from your FPV craft and it goes thump in the distance. Being immersed in flying you likely have near zero idea where that thump came from. Then, if the battery has not been knocked out of the FPV craft, you notice that the Simple Tracker Pro continues to point in the direction the signal is coming from. Several times now I have watched someone walking across the waist-high hay field with their Simple Tracker Pro in the air. Without fail they quickly found the downed craft. Once again, the Simple Tracker Pro paid for itself!
The Simple Tracker Pro that I use (featured in this review and video) incorporates the upgrades listed below. I should note that everybody I know that currently uses the Simple Tracker Pro has these upgrades and everyone is impressed with its performance.
2 Boscam F632 Receivers add - $109.33
3 Amoway Antennas add - $45.42
3 50cm Antenna extensions add - $17.37
1 tripod add - $12.99
Total cost for the Simple Tracker Pro with these upgrades is $262.11 (3-10-2017) which reflects a sale price that includes shipping. Originally the Simple Tracker Pro cost $354.11. I know it’s not cheap but if it helps prevent the loss of a FPV vehicle just once it probably paid for itself. I think it is worth the peace of mind and enjoyment I get from the consistent video feed to my goggles. My RC budget is way smaller than I would like but this kind of expenditure is well worth it to me because it makes this kind of flying far more enjoyable. After all, we fly RC for the enjoyment and the Simple Tracker Pro helps me achieve that.
The Simple Tracker Pro is to me a remarkable bit of technology that I can apply to my flying at our field. The difference between my aborted initial attempt at FPV flying and now is the solid video signal I get from the Simple Tracker Pro. It is way more fun to fly FPV when you can see what is going on through the whole flight.
Another big factor in favor of the Simple Tracker Pro is that it works on its own with no input from the pilot which lets us focus on flying better and faster. To me, technology is supposed to be automatic and the Simple Tracker Pro is that. As long as I remember to plug the battery in and turn the receivers on it feeds me a far more consistent video signal that results in my FPV vehicle flying back to me and not me hoping to find it anytime soon.
Visit the Simple Tracker Pro web site – Click Here
Simple Tracker Pro Instruction Download
Have a comment on this Review? –Email Me!