|
|||||


FlyingRC.net is a
Veteran-Owned site.

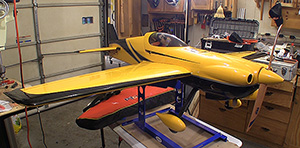 |
The goal of this build segment was to get the RedwingRC 30cc MXSR ready for flight and here it is on the balancer, ready to go. Click image to enlarge |
RedwingRC 30cc MXSR – Segment 2
Completing the build and setup
Text, photos and video by Tom Hintz
Posted – 4-20-2015
To begin Segment 2 of the RedwingRC 30cc MXSR build I completed the installation of fixed equipment like servos, landing gear and the engine. All of these components impact the CG and since we do not have options on where they go I install them before starting to place the batteries and electronics that I can move around.
Engine Standoff
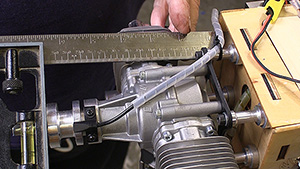
We have to determine the engine standoff according to the distance from the firewall surface and the front edge of the cowl. Most cowls on giant scale planes are pre-set so we have to use the engine standoff to get the surface of the prop seat ahead of the cowl enough that the back of the prop or spinner plate clears the front edge of the cowl. This dimension must be figured out for each engine as their overall length can differ substantially.
With the cowl bolted in place I use an 18” combination square to measure from the face of the firewall to the most forward edge of the cowl. On this RedwingRC 30cc MXSR I came up with 6-1/4” from the firewall to the front edge of the cowl so added another ¼” to allow for the thrust angle of the motor. Remember that the engines are mounted at an angle to the centerline of the plane so usually the right (pilot’s right) edge of the spinner back plate will be closest to the cowl. I used 6-1/2” to determine the standoffs, installed the engine with that setup then installed the cowl. Using the spinner back plate I could see that I had about 3/16” clearance at the closest spot so my standoff is correct for this plane and engine combination.
The fuel tank is always placed as close to the CG point as we can so that the changing fuel load does not change the handling of the plane dramatically. Because of the wing tube we have to choose to install the tank behind or in front of it. Here again, the best choice is ahead of the wing tube so that with a full tank the plane will begin a flight a bit nose heavy rather than tail heavy which can cause severe handling problems.
Setting the CG
 |
 |
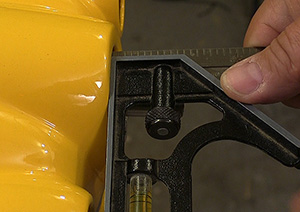
Measuring from the firewall to the cowl end (left) is crucial for figuring the overall engine standoff length. (right) We have to allow a 1/4" extra for the engine thrust angle. Click images to enlarge |
|
I should note that the instruction manual that comes with the RedwingRC 30cc MXSR on disk has a page that speaks about CG and actually provides three locations. All of these are wrong which is not as unusual as it might seem. I think this kind of error comes when revisions are made to the plane, especially during the development stage. The RedwingRC 30cc MXSR as you get it has the CG located 5-1/8” back from the leading edge at the root and that correct location is listed on the product page for this plane on RedwingRC’ s site . I fly my RedwingRC 30cc MXSR with this CG and can say that it flies very well. It is responsive without being touchy. I strongly suggest you start out with your CG at the 5-1/8” location and then after flying it make very small changes if you feel the need.
To get the CG right I began moving the two main batteries around. I had put the ignition battery on the motor box early on and followed that with moving one of the main receiver packs to the bay meant to be a canister exhaust exit. If you use a canister style exhaust one of the battery packs could be located next to the fuel tank.
I wound up with the other main battery pack secured to the bottom of the fuse by the rudder servo. Between that location and the addition of a doll/pilot my RedwingRC 30cc MXSR comes in just a tick tail heavy. By a tick I meant very little. On the balancer the tail hangs below flat by about ¾”.
With all of the components located right for the CG I went back through the RedwingRC 30cc MXSR to make sure everything was secured and that there were no conflicts between the rudder servo movement and the wiring. I also went over all of the control movements and radio settings once more to be sure I had the correct throws and dual rates all on the rudder switch where I always put them. With those checks complete I charged the RedwingRC 30cc MXSR up as the last step to get it ready for its maiden flight.
Maiden Delayed
Between lots of rain and a nagging engine problem the full maiden of the RedwingRC 30cc MXSR was delayed a couple weeks. I did fly it a couple times the first weekend and you will see the first deadstick that first revealed the engine issue. I had moved the entire fuel system over from another plane where it performed fine but I am going to change that system out for new components, located in the same place to reserve the CG. The carb is also getting cleaned in and out to be sure there are no obstructions.
 |
|
Maiden #2 |
|
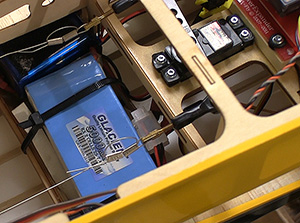
The batteries (left) are the main weight that can be relocated to get the CG right. Click image to enlarge |
|
The next decent day at the field will be the full maiden where I can really check the RedwingRC 30cc MXSR out to be sure it is flying straight and see what it wants to do. This will also be when I tweak the CG if it needs it and hopefully get the motor dialed in correctly for this cowl.
Visit the RedwingRC 30cc MXSR product page – Click Here
Have a comment on this story? –Email Me!
All Flyingrc.net written, photographic and drawn materials are property of and copyright by Tom Hintz and Flyingrc.net 2013-2020 Materials cannot be used in any way without the prior written permission of the owner.
Privacy Statement