


Adding the two rods to the elevator halves makes it easy to see if they are not
synced up. Adjustments are dead on accurate also.
Text, photos and video by Tom Hintz
Posted – 7-17-2017
Over the years the pure size of elevators, especially those on purpose-designed 3D airframes, has grown a bunch. Not so long ago the elevator represented a minor portion of the horizontal stabilizers’ total area, today the elevators are routinely the larger percentage of the horizontal stabilizer. That obviously increases performance but also highlights the relationship elevator halves with each other, particularly when they are not synchronized. The days of standing behind the plane, giving it full up and declaring the elevators to be aligned with each other are over. As the performance of the control surfaces and the overall airframe increases so does the need to set them up precisely.
Getting the elevator halves in sync takes some time but is cheap in terms of the tools needed. You also don’t have to continually average the readings of throw meters as you move them from one surface to the other and back again, usually several times. The old ways got the job done but often included a robust amount of error. I think we can be more precise, in less time using the procedure described here.
I use a pair of carbon fiber pushrod blanks about 24”-long and a bit under ¼”-diameter. I use carbon fiber rods because they are exceptionally rigid, especially in this length so our “readings” are spot on they are also very light so they do not bend or cause the control surface to “droop” under their weight.
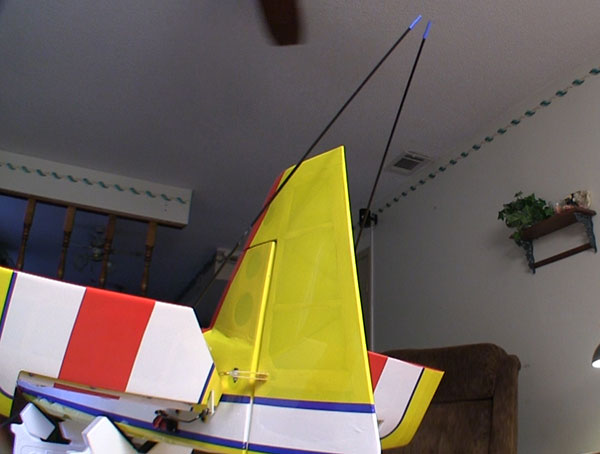
I use masking tape to mount the rods to the top of the elevator halves, angled in so that they meet in line with the trailing edge of the rudder when it is in its neutral position. I’ve never been real picky with this part of the because if the rods are the same length and their ends are close to each other, we can clearly see even tiny differences in the elevator halves.
If anything, you must be careful about freaking out if the rods separate when you run the elevators full up or full down. We must remember that a couple inches of separation at the ends of the rods during this movement is really a fraction of an inch at the elevators. We want to minimize the amount of error we see throughout the throw range but don’t get fanatical about it. The whole point of using the rods is to make those tiny variations visible so we can get closer to a perfect alignment.
For me the easiest way to get started is to dial in one elevator half so that it is neutral when the transmitter sticks and all trims (including sub trim) are neutral. This is important any time but can be especially so if you use one of the gyros (flight control systems) as they often see trims as stick inputs and they try to correct for that. Things can get a bit dicey when that happens.
With one elevator dialed in I put the rods on. Then I can go to the other side and adjust that linkage until the ends of the setup sticks are even with each other in their neutral position. Initial setups should always be done mechanically regardless of the type of plane. I hate geometry as much as anyone but at this level it simply means getting the servo arms square to the airframe in their neutral position.
Then we can use the transmitters capabilities to adjust the ends of travel in both directions. Other than making sure both servo arms are the same length and that the linkage is connected at the same distance from the servo arm’s center setting the end points is generally left to transmitter adjustments. In the case of the Aura 8 from Flex Innovations, they recognized that and included provisions within that system to make these adjustments. Other gyros/ flight control systems may also have adjustment capabilities or you might be able to use the transmitter adjustments without impacting that flight system. Check your documentation before assuming anything!
In most cases, dialing in the elevator halves makes the plane fly more consistently and less likely to try and roll out of a prolonged elevator input such as when doing big loops and similar maneuvers. But, I had an Extra that really came alive after I got the elevator halves working together. I had made no other changes to the plane but the elevator had become exceptionally sensitive/effective. I had a couple dual rates set up (I always have dual rates just in case, like this time) so was able to slow everything down get used to the new handling before something big happened.
Matching the elevator halves is something we should be doing on all our new planes and checking occasionally on airframes with lots of flight time on them. It only makes sense to be sure we are getting everything the airframe has to offer. This is a simple, cheap way to maximize your planes handling. I firmly believe that getting those elevator halves aligned makes many aerobatic moves cleaner and easier to do.