


A simple rod makes operating the all-important choke a simple task without adding
a bunch of weight to the plane.
Text, photos and video by Tom Hintz
Posted – 7-10-2017
I know some of you feel that you look cool while flipping a switch on your transmitter to choke your gasser. Sometimes it’s awkward when you have to tell people what you just did or they wouldn’t be impressed by your use of everyday RC technology to complicate the most basic system on the airplane. Since I am seldom impressed with people being impressed with something I’ve done I choose to go the low-tech route (most of the time) and make my own manual choke lever. How else can I show off my fancy Z-bend pliers?
Full Disclosure: I do have one plane with a servo-operated choke, my Top Flite™ Giant P51D Mustang ARF. I simply could not come up with a reasonable way to get a manual choke rod out the front of this streamlined warbird so did the servo-operated choke deal.
There are two basic directions that a manual choke rod moves. On most single cylinder engines, the carb is on the back side and the choke rod is pushed in and pulled out to operate it. On many multi-cylinder engines, the carb is pointed down under the cylinders and the choke rod moves up and down to work the choke plate.
To be very honest, I have the most trouble remembering which way closes the choke plate. If all engines of a basic design sported chokes that worked the same way this would be easy. However, somehow the engine manufacturers have figured out how to create diversity where we didn’t need it.
Use soft steel rod for making choke rods. There is no reason for high-quality steel (including music wire) for more rigidity. I’d just as soon have a nice soft steel rod that will collapse if I somehow wad up the airplane. I have seen these soft choke rods post-crash hammered into a remarkably compact and intricate wad and still connected to the choke arm on the carb that is undamaged. Besides, bending harder metals to the shapes we need is a huge pain in the butt.
In the old days of the 72mHz radios connecting a metal rod to a metal arm had the potential to fake out the radio when it vibrated and the metal-to-metal contact set up some kind of radio frequency, somehow. Today, the new radios don’t seem to suffer such shortcomings so I whip out my Z-bend pliers and make an end that goes in easy and stays put. I have used ball-links on occasion but the Z-bend just seems to be easier, and I have that cool Z-bend pliers.
Somewhere along the way we must support/capture the choke rod so it doesn’t just flail around inside the cowl and wind up someplace we can’t see, or reach. Taking the time to make a metal bracket through which the choke rod could run seems like way too much effort. Many years ago, while trying desperately not to over-think the issue I hit on using plastic zip-ties after using one to hold a too-long fuel line away from the muffler. It didn’t melt from being so close to the engine so I felt free to use them for other stuff in the cowl.
The trick to using zip-ties is to use two of them. One just isn’t right. In the situation with my new QQ YAK 54 35CC ARF the second zip-tie just locates the first one. Other times I have suspended the choke rod with two zip-ties, one going over the top stand-off and around the choke rod and the other zip-tie going around the bottom stand-off and around the choke rod. Tighten both slowly and you can suspend the choke rod while allowing it to move back and forth easily. If you are looking for real genius in things I do this might be as close as we will get. Sorry.
The last issue to be aware of is the length of the rod when finished. Push/Pull choke rods necessarily come out behind the prop. That means we must pay attention when making the final bends so that in its full-out position, the choke rod is still behind the prop. A long time ago, during a weak mental day I tried making a choke rod about ½” longer than it should have been. Naturally, the engine fired on the first flip and beat my new choke rod to death. Remember that cheap, soft steel? The prop lived and that brave the choke rod sacrificed itself.
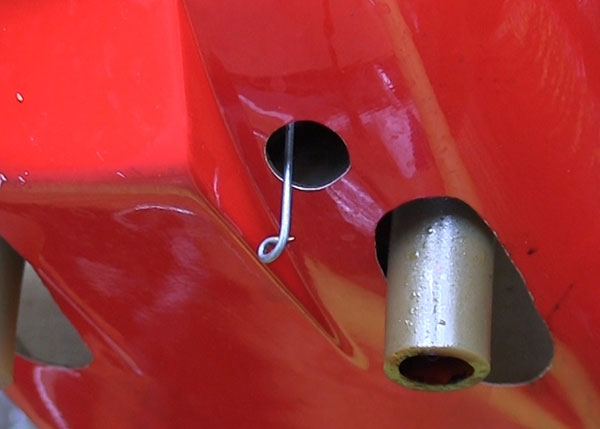
We need to fashion something at our end of the choke rod to get a grip on it to operate the choke. I generally bend up a little, often miss-shaped, circle-like deal. A simple loop that your fingers can grasp will do nicely. I just know that someone will try to put a little, way-too-fancy knob in there in which case I hope he didn’t pay attention to the length thing mentioned above and the prop knocks it off the rod and into the tall grass.
This story is way too long for what we are doing here but I try to head off the common questions I suspect will be coming. A manual choke rod is supposed to be simple and it really is. Being RC modelers appears to include a knack for over-engineering stuff that is better left simple. However, you decide to do it, remember the soft steel (common pushrod stock from the hobby shop) and that overall length thing.
And no, I don’t know if your choke assembly is an “inny” or an “outty “.
Have a comment on this story? –Email Me!