


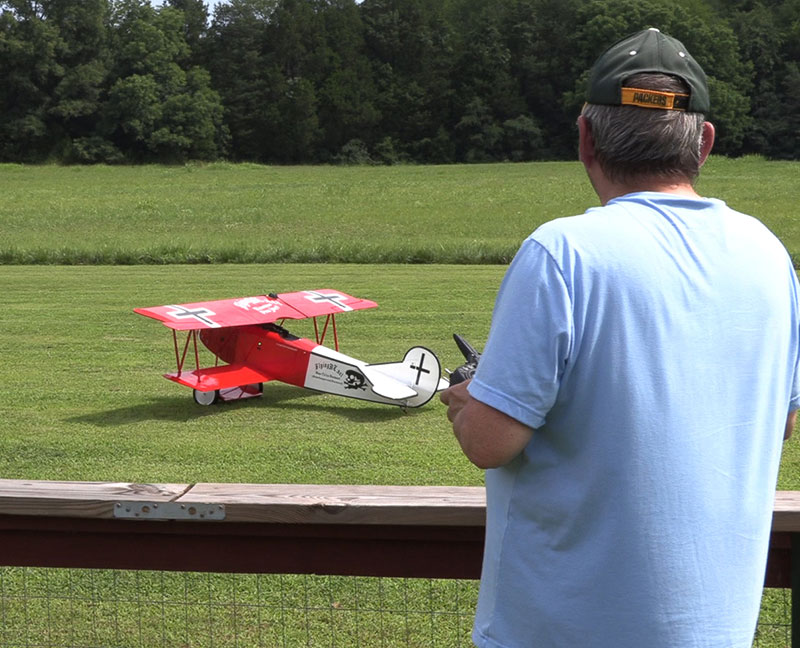
Getting my D7 ready for the field took more work than I anticipated but for a plane like this, it was not bad.
Text, photos and video by Tom Hintz
Posted – 7-1-2019
Note: FlyingRC.net Protector sets and components now available for the Hangar 9 D7! - Click Here
Though admittedly rare, I occasionally get the hots for an airplane simply because it looks cool. The fact that this one comes from Hangar 9 didn’t hurt anything. Combining the Hangar 9 Fokker D7 with modern radio gear and a “sort of” fresh DA50R already in my shop made this a no-brainer Review Project for FlyingRC.net.
The Hangar 9 Fokker D7 was designed for 30-60cc gas engines or equivalent electric power. It has a wingspan of 87" (2210mm) and is 72" (1829mm) long overall. Its wide, thick wings provide a wing area of 2430 sq in (156.8 sq dm) that easily supports the projected flying weight of 23 to 28lbs (10.4 - 13kg). My ready to fly Hangar 9 Fokker D7 weighs 25.6lbs dry.
The Hangar 9 Fokker D7 isn’t designed to win true scale contests, but for the average RC pilot it looks surprisingly real, especially in the air. It has dual machine guns; exterior exhaust and a realistically shaped cowl complete with a factory-installed metal radiator grille and prop shaft location. I did have to open the prop shaft opening slightly to fit my DA50R and its crankshaft ignition pickup and manual choke.
One of the more striking features is the 8”-tall, scale looking wheels. Those huge wheels are mounted on a hidden suspension system to help tame bumpy runways. The “tail wheel” on the original Fokker D7 was a non-steering chunk of wood and that carried over to this model. I like that concept but will wait until I get to taxi the Hangar 9 Fokker D7 to see if I still like it.
The covering on the Hangar 9 Fokker D7 is well done, as usual. The cowl red paint varies slightly from the red covering that is slightly lighter. It’s not a deal-breaker but is noticeable. After two weeks in my shop no wrinkles appeared in the covering. Being summer in North Carolina means the Hangar 9 Fokker D7 will be subjected to wild temperature/humidity changes that might require a couple passes with my heat gun.
Advancements in material technologies allows the use of CA hinges throughout this giant scale plane. I have no idea how they continue to function without splitting but they do. It’s also difficult to install this type of hinge in a way that limits travel of the control surface. The Hangar 9 Fokker D7 does not need huge throws but knowing the maximum is available is reassuring to me.
Probably most important to most of us is the ease and speed of installing CA hinges. A couple drops of CA from either side of each hinge and you are done. This also eliminates me winding up with epoxy on things and in places it surely does not belong.

This is my first plane with an upright engine. That
meant I needed a new muffler to get by the firewall
and out through the top of the dummy engine.
I’m not a big fan of these cables but seeing the width of the Hangar 9 Fokker D7 tail feathers that aversion was replaced with a dose of reality, and I did my best to install them. The included metal tabs needed a little tweaking to be truly aligned with each other as they nearly always do regardless of the manufacturer. Perhaps I just wanted to whine about something on this kit.
Let it be known that I like Hangar 9 models, have owned a bunch, flown way more and will have more in the future. The Hangar 9 version of the Fokker D7 floats my boat in nearly all aspects aside from the “scale” features of the cockpit. Specifically, assembly and weight. I really should have expected assembly issues when I read the instructions that repeatedly state to use hemostats to install some of the nuts.
I try to show all important assembly issues but my pledge to never include foul language on my sites precludes a portion of that footage. I was minutes away from just burning the machine guns and claiming to have never seen them. I got them in, not exactly how Hangar 9 wanted but I paid for the plane so if that is not scale enough, look elsewhere. I don’t care anymore.
The Hangar 9 Fokker D7 comes with a scale-looking pilot and I was initially happy about that, until I picked it up. This plane has a short nose moment, so I expect to be adding weight on the nose to hit the CG. Knowing that made installing a pilot well behind the CG point that weighs 345 grams tough for me to accept.
I noticed a bunch of the pilot bust was not visible when installed if you didn’t get up close and look down inside the cockpit. Out came the Dremel and a bunch of dust later I had a pilot that now weighed 250 grams. If I find myself looking for weight to lose after flying the Hangar 9 Fokker D7 (or during balancing) the pilot could be in danger. I epoxied the figure into the cockpit and intended to add a couple screws to further secure it but left those out. If the pilot figure breaks free and ejects, I’ll assume that to be an omen from the CG Gods and forgo the search effort.
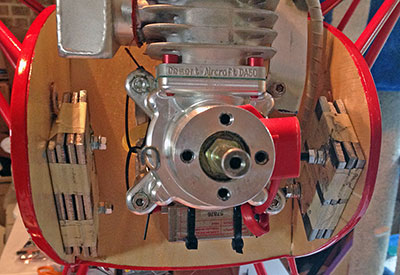
There is plenty of room for the engine, and the wad of
weight needed to get it balanced. They CG as in the
instructions seems to be right.
I haven’t mounted an engine with the “cylinder up” since my glow fuel days 30-some years ago so was surprised to find this configuration in the Hangar 9 Fokker D7. It makes perfect sense however as it puts the cylinder directly behind the screen section of the scale Fokker D7 cowl. That orientation puts the muffler pipes pointing up rather than down. Despite the 195mm firewall to prop washer dimension the 45-degree pipes on my Pitts-style muffler did not clear the firewall, not even close. I used a Bisson PN 09252 Desert Aircraft 50 wrap-around, Pitts style muffler with 15-degree pipes and it fit perfectly.
Cutting the cowl was not difficult, especially after my mind grew accustomed to the engine mounting. The fake exhaust is glued to the top of the cowl so that also had to be fit around the spark plug and exhaust pipes. Again, not difficult, just a little time consuming.
When cutting the (hollow) fake exhaust, the underlying white plastic showed up on the edges and inside. I gave it a couple quick coats of flat black paint which I think is more scale than the shiny black of the plastic.
I found that one of the front landing gear wire braces must be disconnected at the top to allow the lower cowl section to pass through, then that wire replaced. That is literally a one bolt deal.
The rubber on the 8”-tall, scale-looking wheels was formulated to support the plane while resisting flat spotting during storage. The instructions call for drilling the centers of the wheels and inserting a brass sleeve, but my kit must be a more current version as that operation was already done at the factory. The sleeve is just to prevent excessive wear between the plastic wheel and steel axle.
The Hangar 9 Fokker D7 has a suspension system that helps absorb bumps in the runway and less than stellar landings. To retain the scale look that suspension mechanism is secreted within the landing gear wing. Steel axles are combined with bungy cord, wrapped in a figure eight above the main axle allowing for upward motion of the wheels when they hit bumps. You can regulate the tension of the bungy by how tightly it is wrapped. The instructions suggest moderate tension (whatever that is) but I think a slightly tight bungy works better.
One of the traditional drawbacks to a biplane has been building and installing complicated strut systems that strengthen the wings. The folks at Hangar 9 simplified this with pre-built, bolt on assemblies that are quick, strong and ensure accuracy.
One thing I was not comfortable with is the simple screw and lock washer used to fasten these struts to the tabs (with pre-installed blind nuts) built into the wings. During the maiden flight two of these screws fell out. Whether it was my fault or not, I think a longer screw is in order. I used 3mm by 16mm-long bolts that extend through the blind nuts enough to add a nylon insert locking nut.
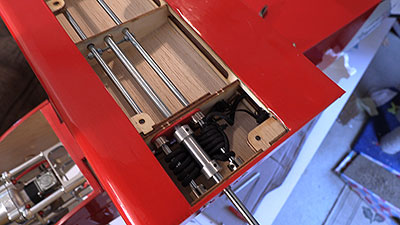
The main wheel suspension is hidden in the "wing"
between the wheels. It's a bit of a pain to assemble
but works well.
The cabane struts are pre-built and threaded inserts factory installed at the fuselage mounting points. I did have to open a couple recesses where the struts anchor to the fuselage slightly but that added perhaps two minutes to the process. It seems that most owners leave the upper wing center section in place during transport and I think that is a good plan.
To make installing the upper wing center section the first time easier I left the cabane strut bolts a bit loose to aid in alignment. Once that was installed, I tightened all the mounting points. Of course, blue Loctite was used on all fasteners.
The Hangar 9 Fokker D7 comes with a pair of wooden cradles and rubber bands designed to allow removing the upper and lower wing panels as an assembly (a left and a right assembly) so they can be transported that way. I remain a wing bag fan, but some owners may have a situation where the cradles are more appropriate.
Hangar 9 makes good ARF’s (Almost Ready to Fly) and the Fokker D7 stays that course. The kit went together easily with the most time-consuming part being cutting and fitting the cowl, as occurs with many kits. The instruction manual is more than adequate, especially if you read it.
The Hangar 9 Fokker D7 has the short nose moment from the original plane and that usually makes balancing on the proper CG (center of gravity) point an exercise in hiding a bunch of weight. I had seen comments from previous Hangar 9 Fokker D7 builders saying they had to use a few pounds of lead to get the balance right. Knowing this I tried to put everything I could, including my usual pair of 5000mAh LiPo packs, as far forward as possible during the build process.
Despite that forward building my Xicoy Digital Weight & Balance CG Meter Pro scales still demanded 2lbs 14oz of weight be added ahead of the firewall to hit the mid-range 7” from the leading edge (top wing) CG point. I came up with 2lb 12.4oz of steel and the bolts to install it which would prove to be as close to perfect as I have ever been. I was able to mount the weight to the inside of the fuselage “cheeks” which put it as far forward as possible. The manual gives a range of 6” to 8” but we decided to be a little conservative, at least initially.
During the balance process, the included pilot figure was ejected. I just could not justify having that much “for looks only” weight so far behind the CG point. The weight of the pilot bust also would require another 8 to 10-ounces of weight be added to hit the CG.
The Hangar 9 Fokker D7 is a very good kit that produces great looks in an easy-to-fly airframe. This is an easy ARF to assemble that gets you to the field (with a big biplane no less) sooner than most. I did not encounter any serious issues during the build other than getting the cylinder-up engine mounting scheme firmly in my mind.
The Hangar 9 Fokker D7 sells for $799.00 (6-30-2019) which includes some scale features you often must buy separately with many kits. I “grounded” the pilot bust in my Hangar 9 Fokker D7, but the airframe can handle carrying that weight. I paid for the plane, so I get to pursue light even if it costs me scale points.
Another important feature is the 8”-tall wheels. Aside from being scale-looking, they make flying off virtually any grass runway simple. The Hangar 9 Fokker D7 mild manners and docile landing speeds make it compatible with most flying fields.
If you want a classic warbird (or your first giant biplane) the Hangar 9 Fokker D7 is going to be hard to pass up. This is one of few warbird models that can be considered an every-day flier. It’s easy to assemble and easy to fly which gives you more time to look cool on the flight line.
Anderson RC (Thomasville, NC) (336) 476-6917
Hangar 9 Fokker D7 product page
Have a comment on this Review? – Email Me!