


When I got carried away trying to touch the rudder to the ground during a hover I
sort of dinged the rudder. You get more content.
Text, photos and video by Tom Hintz and Gihad Jawhar
Posted – 7-16-2015
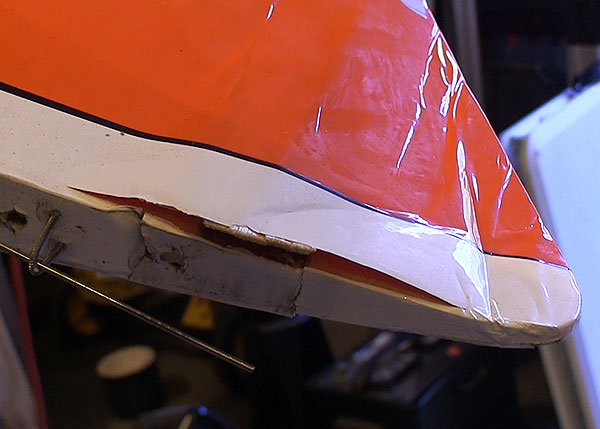
When I did my first “tail touch” with my Aeroworks 50cc Edge 540 I discovered that a: the ground was pretty hard and b: I was tail-sliding the plane towards the ground faster than was smart. As you might suspect there are consequences for that kind of error, in this case a slightly crunched rudder.
The Aeroworks 50cc Edge 540 has a fully sheeted rudder and that both complicates and simplifies the repair. Sometimes having an open structure is often easier to fix but in this case where I have some high dollar graphics on the rudder covering the sheeted style rudder is easier to work with since I can cut less of the covering open to make the repair.
Another thing in my favor is that the damage was confined to the first few inches of the lower portion of the rudder. This also shows that I actually did have the plane very close to vertical when the “touch” occurred.
I also noted that the damage seemed to be confined to one side of the rudder. The sheeting on the other side had flexed but I could not find any actual breaks so was able to run some thin CA down the one crack I could see when I had the damaged side open. That stiffened the sheeting on the opposite side like it was before the incident.
One thing to remember is that without stripping all of the sheeting and starting over a repair like this means we are making some compromises. I certainly want this portion of the rudder to be strong enough to handle flight pressures but the relatively small area gives me more options.
I used a hobby knife with a new blade to cut the covering open and taped that flap back out of the way. I clamped a couple short pieces of angle steel to opposite sides of the rudder to hold the major structure straight. Using CA I secured all of the major pieces in position making sure to get all of the perimeter parts first. With those parts secured I could remove the clamp and angle steel to finish gluing the breaks and cracks.
The point of a hobby knife comes in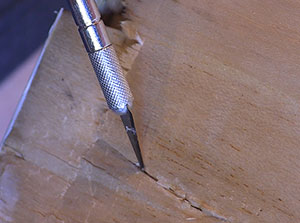
handy when trying to align small pieces
for gluing.
I used the point of the hobby knife to leverage the cracked sheeting back up to approximate its original position. Balsa stretches and compresses during an incident like this so without replacing it altogether we are not going to get it perfectly flat without cheating a little. After lifting and CA’ing the sheeting back into position as closely as I could the rudder was ready for the final piecing together. A couple pieces of balsa had come out altogether so I trimmed and glued them back in place as close as was possible.
Thin CA was applied to all of the exposed seams just to be sure the structure was a rigid as possible while I had the covering open. I completed this portion of the repair by using a sanding bar to flatten the high points created by repositioning the pieces of sheeting.
I could stick the covering back down right now but the slightly irregular surface beneath it would be magnified when light reflects off of the covering. There is a simple –and light – way to remedy this though. Spackle! I know there will be naysayers but this has worked in the past and it will work now. Much of spackles weight is water so once we allow that to evaporate off and then sand away the excess spackle the actual weight added to the model is close to nothing.
Using a regular spackle knife a thin coat of spackle is applied to the repair area trying to fill only the low spots. Let that coat dry, hit it with the sanding bar to remove spackle from the high spots and apply another thin coat to the area. Repeat this process a few times to be sure the low spots are filled.
Once I am convinced there is enough filler I use the sanding bar to level everything one final time and then go over the area with a fine sanding block just to smooth the surface. Then spray the area with alcohol and immediately wipe it down with a paper towel to remove dust. Repeat this a couple times to be sure that the area is as dust free as possible. Then I point a fan on the repair and let it air dry for an hour or so to be sure it is all dry. I do not want to trap any moisture with the covering.
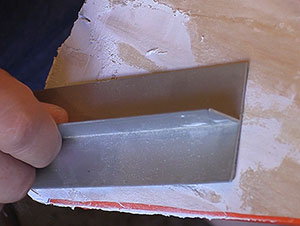
A sanding bar helps get a straight,
smooth surface that makes the covering
look better when finished.
It would be a great idea to prep the repair area with a material such as Balsarite. Unfortunately I did not have any on hand (my bad) so toughed it out and ironed the covering down to the wood.
With the covering iron at roughly half power I stuck the covering down around the edges of the flap I had opened up. Even though this is a sheeted rudder I do not iron the covering down over the entire surface.
Once the edges are sealed down I cut strips of the same color covering and seal them over the seams because there will be a little line of bare wood showing. These additional strips bridge that gap and get a very good grip on the covering to make this repair (of the covering) much stronger. I work the strips of covering down starting at one end and smoothing it into place as I work down the length.
After all of the strips are installed I use the heat gun to tighten the covering. The strips of covering now come into play as they keep the edges of the repaired covering together as the covering tightens up. Finally a thin layer of medium CA is applied to all of the new covering seams to seal them against fuel and oil.
That’s it. All that remains is for me to be more careful in the future so I don’t have to do this repair again. Of course that is way easier to say than it is to do which is why I have practiced this repair method a few times.
Before taking the model to the flying field it is a good idea to check over the related linkages and servos to be sure damage has not been transmitted back down that system to another part. So far I have not found any trim changes following this kind of repair but be ready on the next flight just in case!
Have a comment on this story? –Email Me!