


Though nearing completion, the Zero was making me nervous with what
seemed to be too much ballast needed and other little hitches in the process.
Text, photos and video by Tom Hintz
Posted – 10-10-2015
While waiting for the Bisson muffler and Robart Electric Retracts to arrive I worked on trimming the wheel wells and canopy. This is not complicated work but it does take time which I had some of at the moment. As I completed the trimming the Bisson muffler arrived followed the next day by the Robart Retracts. With all of the parts in hand to finish the ESM 88” Zero I began the push to get it done by the coming weekend when I could next maiden it. That was important as our club has a Warbird meet the following Saturday and my ESM 88” Zero needed to have some time on it before I could fly it with a crowd present just to be safe.
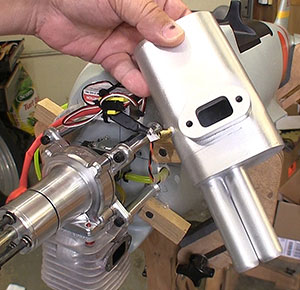
First I bolted the new Bisson side mount muffler to the DA50R and could see that my concern about the cowl ring fitting was right on the money. Despite spending a long time trying to find the magic twist or turn of the cowl to get it past the muffler I jerked the cowl ring out. In its place I made a set of mounting blocks fabricated from ¾”-square oak strips. I used the long set Epo-Grip epoxy and a single screw in each block to secure them to the firewall.
Having the muffler also allowed me to finalize my ignition installation. I was able to put the ignition box on the firewall above the standoffs. Because I am using the Tech-Aero IBEC only one wire from the ignition module had to go through the firewall and that also brings power to the ignition in place of a separate ignition battery.
I plugged the IBEC into the Aux 4 channel on the Spektrum 9-chanel PowerSafe receiver. I assigned the top right two-position toggle to control the IBEC. I had to reverse that channel to have the ignition On when the switch is pulled towards me and Off when clicked away. I always set up ignition kill switches like this because it is way easier to accidentally bump the switch towards the pilot than away. We don’t need to be accidentally shutting off the engine in a big war bird.
With lead everywhere I could put it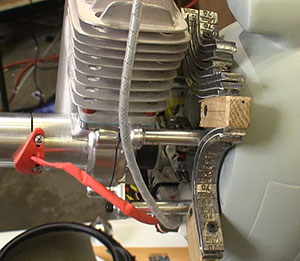
balance was starting to look right.
Probably my most “scale intensive” bit of low-level trickery involved installing the IBEC LED light into the printed dash. When the ignition is armed the LED is a very bright green. I like having the light to confirm that the ignition is armed and putting it inside the canopy will give people something to look at because there will be no pilot figure in the way!
I got out the plastic wheel wells and began fitting them to the wing openings and that’s where this project first came off the rails. I’m not sure exactly how much time I spent trimming, fitting, trimming inside the wing, fitting and doing all of that over and over again. I am sure that none of it worked and the wheel wells looked like crap.
Occasionally I had to walk away because the frustration was getting the better of me and I was closing in on destroying something. During these breaks I searched the Internet to see if someone had a solution for this problem but what I found suggested the easiest fix. I kept finding photos of the ESM 88” Zero without the wheel wells. I love simplicity so tossed my wheel wells in a box to be brought out when I was feeling too happy.
After installing the Robart retracts I had to mock up enough wiring to make them work. I realized the need for extensions of the retract wires and had those on the way for the final installation but I wanted to see them go up and down after the big wheel well fight. I decided to go with electric retracts because of all the trouble I keep seeing people have with the air powered versions. So far I am very happy with that decision. The retracts go up and down reliably and I was able to add a bit of a delay using the control box included with the retracts. The delay gives the gear a “sequence” look during the up and down motions. I also like the fact that these Robart electric retracts can operate on my existing battery packs rather than installing a separate pack just for them. I use two 5000mAh LiPo 7.4V packs in all of my giant scale planes so running out of electrical capacity was not likely even if I played with the retracts way more than is natural.
While I was waiting for the retract extensions I could finalize the rest of the wiring. I added servo extensions for the ailerons, one for the retracts and a Y-cord for the flaps. As is my normal setup I put tape with initials on the aileron extensions to be sure I plugged the correct aileron into each of them during assembly at the field.
Bisson made the only muffler that would
fit within the cowl.
Even with my “move it forward” mantra throughout construction plus hanging a DA50R and a 6+-ounce prop hub on the front the ESM 88” Zero the first time on my EZ Balancer was frightening. The Zero needed roughly 2-1/2lbs of weight at the firewall to hit the CG. I just am not used to adding what amounts to an anchor to a RC plane so re did the balancing three times. It really did need 2 ½ lbs of weight.
I decided to install a few half strips of lead weights inside the leading edge of the cowl. The weights have an adhesive tape on one side and I added black screws through the cowl to further secure them. I know the scale folks will lock up when they see the screws but it’s my plane and I am more concerned with how it flies and how it looks in the air. Also adding that bit of weight to inside the leading edge of the cowl reduced the overall lead needed by ¼-lb.
The all up weight of my ESM 88” Zero is 20 lbs on the button. (no gas) They list the “lightest” flying weight to be around 18.7 lbs with a small engine, small single battery etc. Adding a bunch of lead is way out of my norm but it is very common in war birds and particularly those with fiberglass fuselages. So with all of my overkill equipment coming out at 20 lbs is a good thing. I hope.
On the last build day I took the ESM 88” Zero outside and began fueling it up. Immediately fuel spouted from the overflow. That was followed by roughly 3 hours of digging the tank out and putting it back in. This is the first time I have used a conventional style tank in a long time and this one gets installed upside down because we do it through the bottom of the fuselage. Someplace between those reversals and my ever-shortening memory I kept putting the tank in upside down from how it needed to be. Finally I recognized my error and the tank filled normally.
I got the DA50R running and did a little tuning to be sure it was happy in the new cowl. I also had to set up the throttle because those are never right until the motor runs. Altogether I put 15 minutes or so on the engine in the yard before shutting it down. This DA50R was flown on my RedwingRC 50cc YAK 55 so it is broken in and running strong.
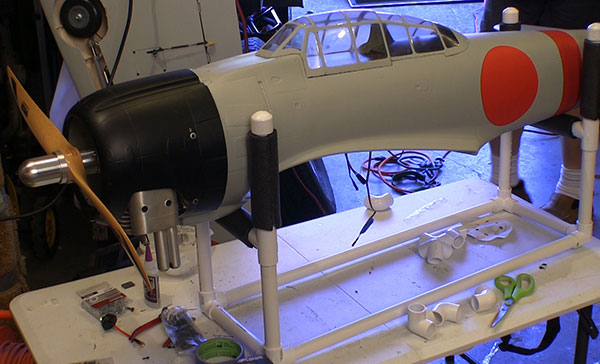
I made a PVC pipe carrier for the fuselage so I could transport it without it rolling around inside the trailer. With that made I charged the ESM 88” Zero up and loaded it in the trailer. Done on the day BEFORE the maiden! Of course that ticked off the RC powers that be and the following day was filled with rain, thunder and other reasons for not going to the flying field.
Have a comment on this Review? –Email Me!