


Getting larger fuselages up out of the way
can save them from damage.
Text and photos by Bill Rutledge
Posted – 8-17-2016
Note: While I am hanging giant scale models from the ceiling you have to consider the overall size and weight of the models you intend to hang. My fuselages are all under 20lbs so represent a small load being added to a joist. You have to be sure that hanging heavier models is in fact a good idea for your structure and vertical space. There are limits to everything including joists, wood and lag bolts. it might be a better idea to hang some of your smaller fuselages to clear floor space for the really big ones.
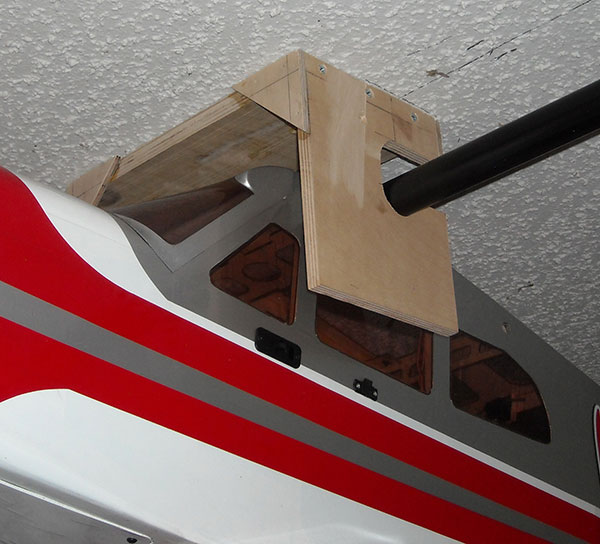
When I wanted to reclaim some floor space in my garage I noticed lots of free ceiling areas that could serve as a fuselage park so-to-speak. My garage has 8-foot ceilings that would put the wheels on my two larger fuselages 6’-3” above the floor. I am 5’-9” so that left plenty of space even in walkways. I suspect most garages will have areas where you can hang planes from the ceiling like this that would afford safe walk ways with some planning on locations.
I built the two hangars in the photos and completed their installation to the ceiling in about 90 minutes. The base that mounts to the ceiling is 3/4" plywood and is screwed to one of the joists in the ceiling with 1/4" lag bolts that are 3” long. Remember you can have a total of 1.25” or more of plywood and drywall or to go through before the lag even touches the joist. Using a little longer lag than might seem necessary is very cheap insurance for your model and your head. Also, the lags should align with the position of the wing tube or dowel so the weight of the plane is not trying to rock the hangar. With a decent stud finder, you can locate the center of the joists easily.
The parts to make this hangar are easily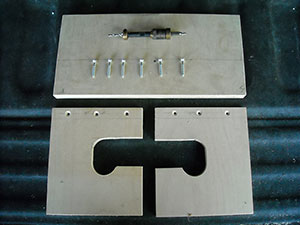
made.
There really are only three primary pieces to these hangars plus the triangular gussets that add stability and strength. I used scrap plywood for the gussets but you can buy smaller sheets of ply at most home centers if need be. I used ¾” thick ply for the main flat piece and ½” thick play for the two side pieces. If your fuselage is on the heavy side, say over 20-pounds you can go to ¾”-thick wood for the side pieces just to be sure.
The strength of this hangar comes from good-fitting joints that are joined with both wood glue and screws. I chose to screw through the side pieces into the end of the large center piece which puts the fasteners in shear which is much harder for the weight of the plane to pull apart. I used a pilot drill with a slight countersink for installing the screws to get the screws slightly below the surface of the wood. The gussets are installed using wood glue and brad nails to hold the pieces while the glue dries.
To size the center piece, I measured the width of the fuselage and added 4" or 2” per side. You could make the hangars wider so that they can accept most any plane you may have in the future. Just make sure that you use strong enough wood and lags secured to adequately sized joists to support the total weight.
My center piece is 13” long and 6-1/2” wide. That gave me enough width to put the fuselage in the hangar without scraping on the sides. The side pieces are also 6-1/2” wide to provide a flat surface for mounting the gussets securely.
The vertical length of the side pieces depends on the plane or type of plane you will put in the hangar. A high wing plane like Cub needs only a couple inches of clearance above the wing tube. A mid wing Edge or similar is going to need a bunch more clearance. You need to measure from the top of the wing tube mount to the top of the fuselage that has to fit inside of the hangar and then add 2” more to make putting the plane in and getting it out of the hangar without scraping it up easier.
You can cut a dowel to fit or use the wing 
tube as the hangar.
The next step is to figure the diameter of the dowel or tube that will support the fuselage. For my Hangar 9 Valiant I am using the 1.25” wing tube. If you use a hardwood dowel get one just slightly smaller in diameter than wing tube. To make the hangar more generic drill the holes in the side plates 1-3/4”-diameter to accommodate a very wide range of airplanes that can be reasonably hung from a ceiling. We want to make the holes in the plates ½”-diameter larger than the wing tube or dowel diameter. This allows us to cut a slot to the holes that is large enough for the dowel or wing tube to pass through before it drops into the bottom of the hole to prevent it from working back out.
Depending on the drill or drill press you might have you can either use a spade bit or a hole saw. With either one make sure to drill with a piece of scrap wood backing it up to help control blow out You can also drill the hole part way through from one side before turning the side pieces over and finish the hole from other side. This makes for neater holes without tear out.
Before drilling we need to determine the hole placement. Put the tube into the fuselage and measure down from the tallest part of the fuselage (generally the canopy or top of fuselage) to the center of the wing tube. Before marking the hole locations on the side pieces I like to make orientation marks on the wood to help keep their orientation correct with respect to the hole locations. The side pieces overlap the center piece so the screws go through the side pieces into the ends of the center piece so we have to account for that thickness when positioning the holes for the wing tube. I begin by laying the center piece on a flat surface, place the end of the side piece flush against the table and slide it up next to the center piece and draw a line with a pencil where the center piece meets the side piece. Repeat for the other side.
At this point I write T O P in the area between the top of the side pieces and the pencil line that is 3/4" below the top edge. Measure down from the top edge of one of the side pieces 3/4" (thickness of the center piece) plus the dimension from the tallest part of the fuselage to the center of the wing tube plus about 2”. This will give you about 2” of clearance between the tallest part of the fuselage when you place the fuselage in the holder. Don’t be afraid to round the numbers up to make it easier to measure. A little extra head room when putting the model into the holder is not a bad thing.
After you establish the vertical placement of the wing tube (or dowel) holes we need to locate them front to back. We want the holes to be roughly centered on the side pieces front to back. make sure you measure both sides from the front so the holes come out square to the rest of the hangar.
If you are building a ceiling mount for a mid wing plane with a canopy like an Extra or Yak the distance from tallest part of fuselage/canopy to center of wing tube might be 10-13” or more. In this case the side pieces will be considerably longer but we still want the fuselage to store about 2” from ceiling. I recommend keeping the width of the side pieces at least 6.5”. This allows for approximately 3” of plywood in front of and below the cutout for the tube.
After the holes are drilled we have to create the slot through which the wing tube/dowel slides to hang the model. Using a combination square, I extend a line from the top of the wing tube/dowel holes to the rear of the side pieces. Measure down from that line to mark the bottom of a slot that is about ¼” wider than the wing tube/dowel is thick. Use the combination square to draw that cut line to the rear of the side piece of the hangar.
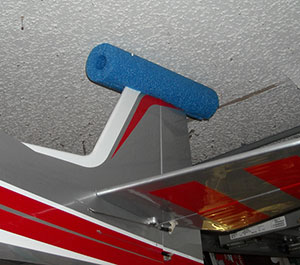
A piece of round foam protects the
vertical stabilizer.
I drilled 3 pilot holes in the top of each side panel half way between the top edge and the pencil line that is 3/4" down from the top. I used #8 wood screws and just happen to have a countersink bit to countersink the heads. If you don’t have the bit. You can use #6 or #8 pan head sheet metal screws.
Assemble the side panels. Remember the real strength comes from the glue. A good woodworking glue like Titebond or a polyester glue like Gorilla will work great. A clamp is not required but if you have one it makes this step easier. With the two pieces glued and held at a 90 degree angle use the side piece as a drill guide to drill a pilot hole through the hole opposite the clamp and tighten a screw. Without moving anything repeat for the center hole. At this point you can remove the clamp if used and drill the last hole and install 3rd screw. Repeat for the other end.
Cut some triangle gussets and glue and nail them with brad nails. If you have a brad nail gun that’s great. If not pre drill 1/16” holes through the gussets and use a hammer to nail in the brads. This step is to strengthen the holder. The triangle gussets on the end with the opening for the wing tube will have to be smaller because of the opening but will still add strength.
Most planes suspended by the wing tube will drop the nose so I place a piece of foam insulation on the top of the vertical stab to protect it against the ceiling. If your fuselage drops the tail when suspended by the wing tube it might not be a good candidate for this type of mount
I use this design for most of my planes but you may have special needs. Modifying this hangar is not hard and it still gets planes up off of the floor or shelves and out of your way. More importantly hanging from the ceiling just might prevent some hangar rash or worse.
Have a comment on this story? –Email Me!